10 ComfyUI Mistakes Beginners Make (And How to Fix Them)
You installed ComfyUI. Watched a tutorial. Loaded a workflow. Click Run with confidence.
And got an error. Or a black image. Or something that looks vaguely like what you wanted but completely wrong.
Welcome to ComfyUI. We’ve all been there.
The node-based interface is powerful, but it is unforgiving when you make small mistakes. The good news? Most beginner errors fall into ten categories, and once you know what to look for, they are easy to fix.
Let’s save you hours of frustration.

Important Note on Model-Specific Settings
The guidelines in this post are general recommendations for beginners to understand ComfyUI behavior and avoid common mistakes. However, settings like CFG scale, step count, and resolution vary significantly across different SDXL versions, fine-tuned models, and specialized merges.
Always check your specific model’s documentation:
- Read the model card on Civitai or Hugging Face
- Look for “Recommended Settings” or “Generation Parameters”
- Check example images’ metadata for creator-recommended values
- Test and adjust based on your specific model
These general guidelines help you understand why settings matter. Your specific model may have different optimal values, and that is normal.
Mistake #1: Not Loading the VAE (or Using the Wrong One)
The Mistake
Your generated image looks off. Washed out. Purple. Grey. Lacking color saturation. Like someone drained all the life out of it.

Why This Happens
The VAE (Variational AutoEncoder) is responsible for decoding the latent space back into visible pixels. Without the right VAE:
- SD1.5 models might use a built-in VAE that’s not great
- SDXL models - Some have a baked-in VAE, some don’t (check model card)
- Custom checkpoints and merges often require external VAE loading
If you do not explicitly load the correct VAE, you get garbage output.
How to Fix It
Important: Many SDXL models already include a baked-in VAE (like sd_xl_base_1.0.safetensors or popular fine-tunes), so you won’t always need to load one manually. If your output looks overly flat, washed out, or off-color, try loading an external VAE (fp16 or EMA versions) — but check the model card first to see if it’s already included.
For SD1.5 Models:
Download and use: vae-ft-mse-840000-ema-pruned.safetensors
- Place in
ComfyUI/models/vae/ - Add a Load VAE node
- Connect it to your VAE Decode node
For SDXL Models:
Many SDXL models already include a baked-in VAE (like sd_xl_base_1.0.safetensors or popular fine-tunes):
- If your output looks flat or washed out, try loading external VAE:
sdxl_vae.safetensors - Place in
ComfyUI/models/vae/ - Check the model card first to see if VAE is already included
For Flux Models:
Use: ae.safetensors (comes with Flux)
- Place in
ComfyUI/models/vae/ - Load it explicitly
Quick Check:
If your image looks purple or washed out, the VAE is your problem 99% of the time.
Pro Tip: Some checkpoints have the VAE baked in (filename includes “vae” or “fp16”). Check the model page on Civitai to see if you need a separate VAE.
Mistake #2: Forgetting to Save the Workflow
The Mistake
You spent 2 hours building the perfect workflow. Tweaking nodes. Testing settings. Getting everything just right.
Then your browser crashes. Or you accidentally close the tab. Or you restart ComfyUI to install a custom node.
And it is gone. All of it.
Why This Happens
ComfyUI does not auto-save. Every change you make is temporary until you explicitly save the workflow as a JSON file.
Beginners coming from Photoshop or other apps expect auto-save. ComfyUI does not do this. It is a web interface. If the page reloads, your work is gone unless you saved.
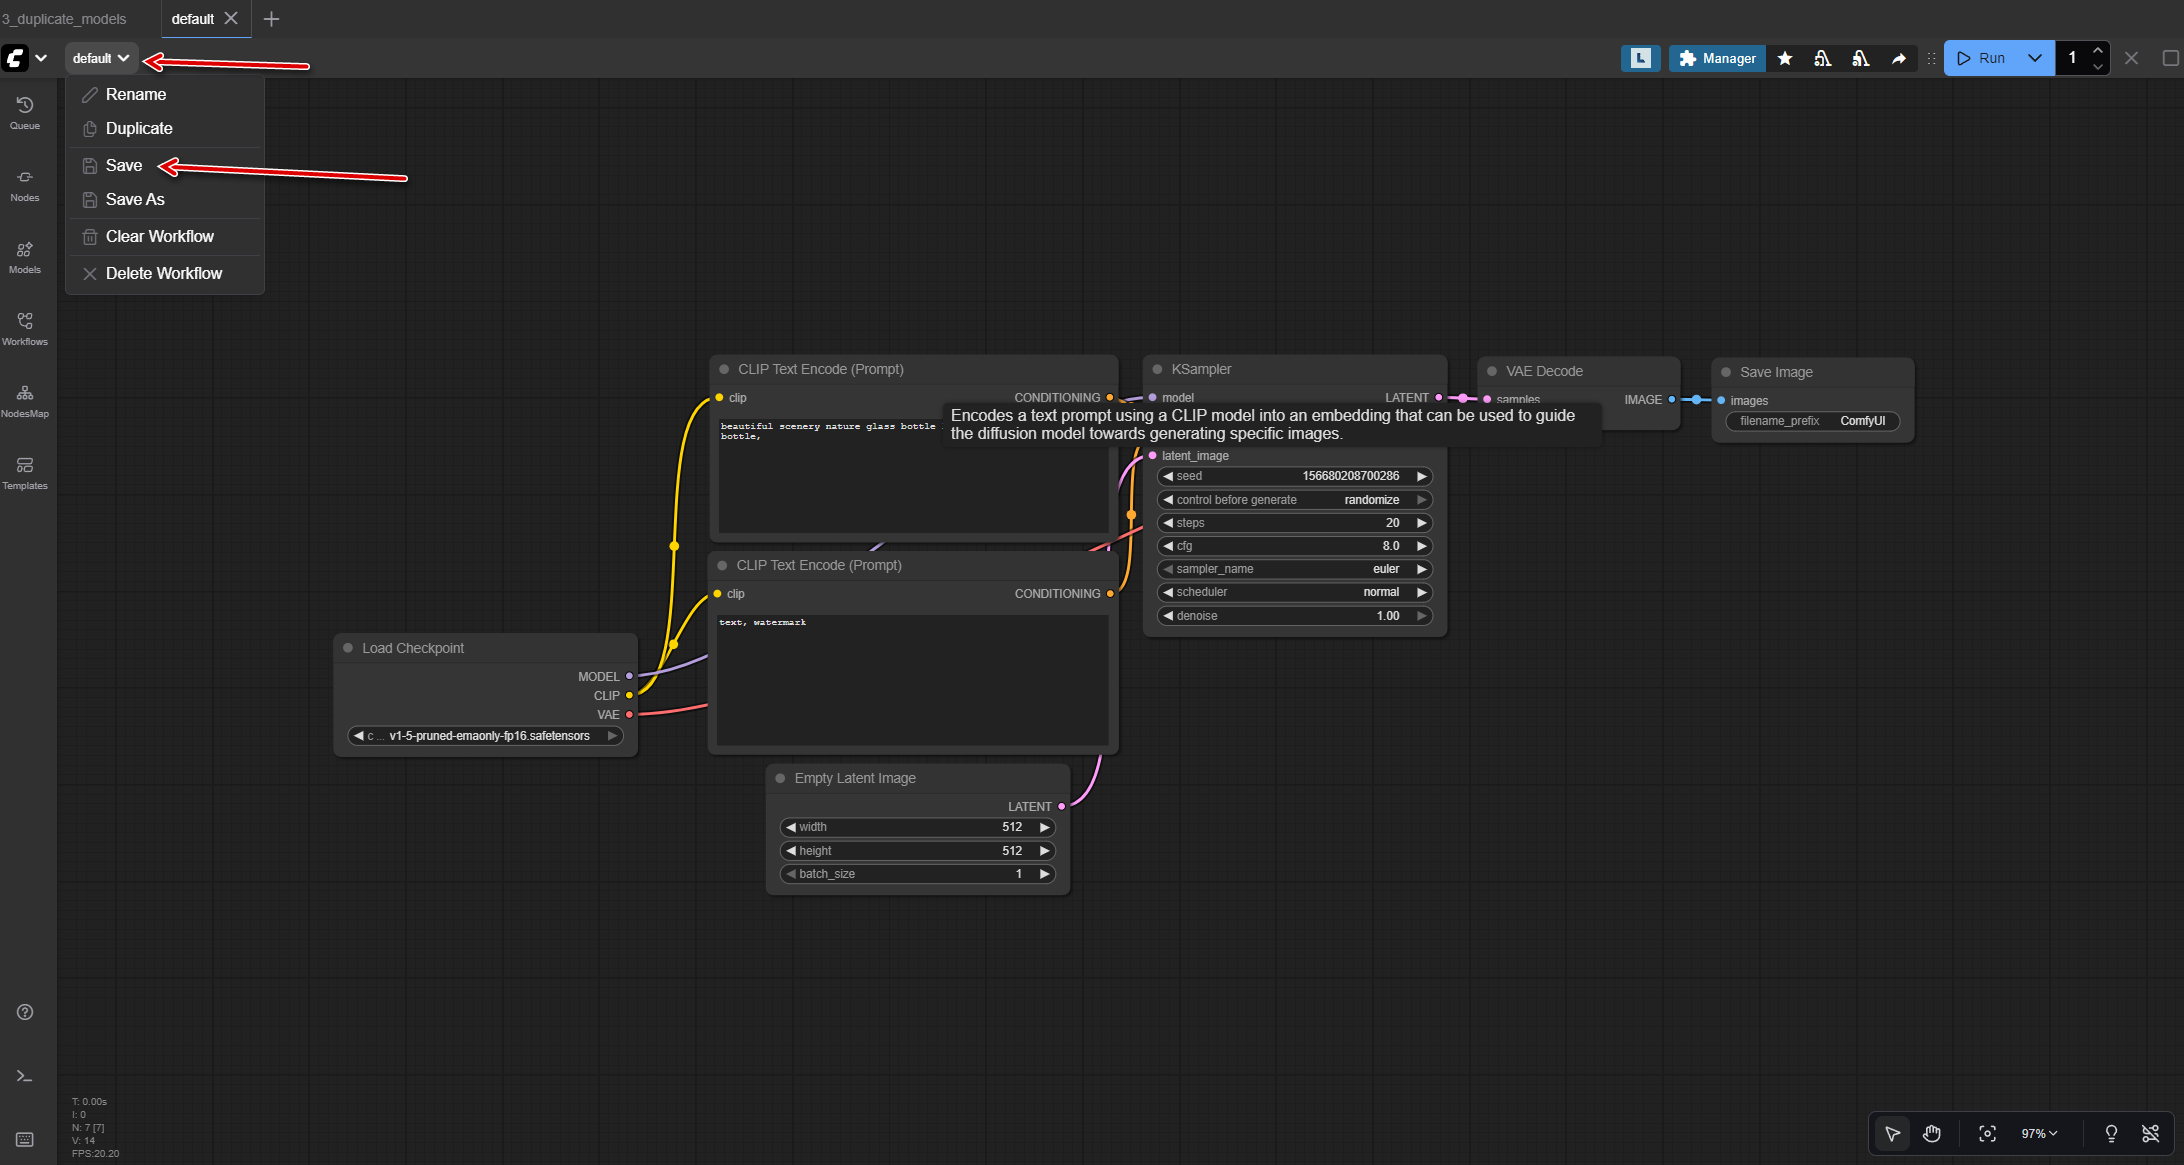
How to Fix It
Save Early, Save Often:
- Click the Save button (top right, looks like a floppy disk)
- Or press Ctrl+S (Cmd+S on Mac)
- Give your workflow a descriptive name:
character-portrait-v1.json - Save it to a workflows folder you can find later
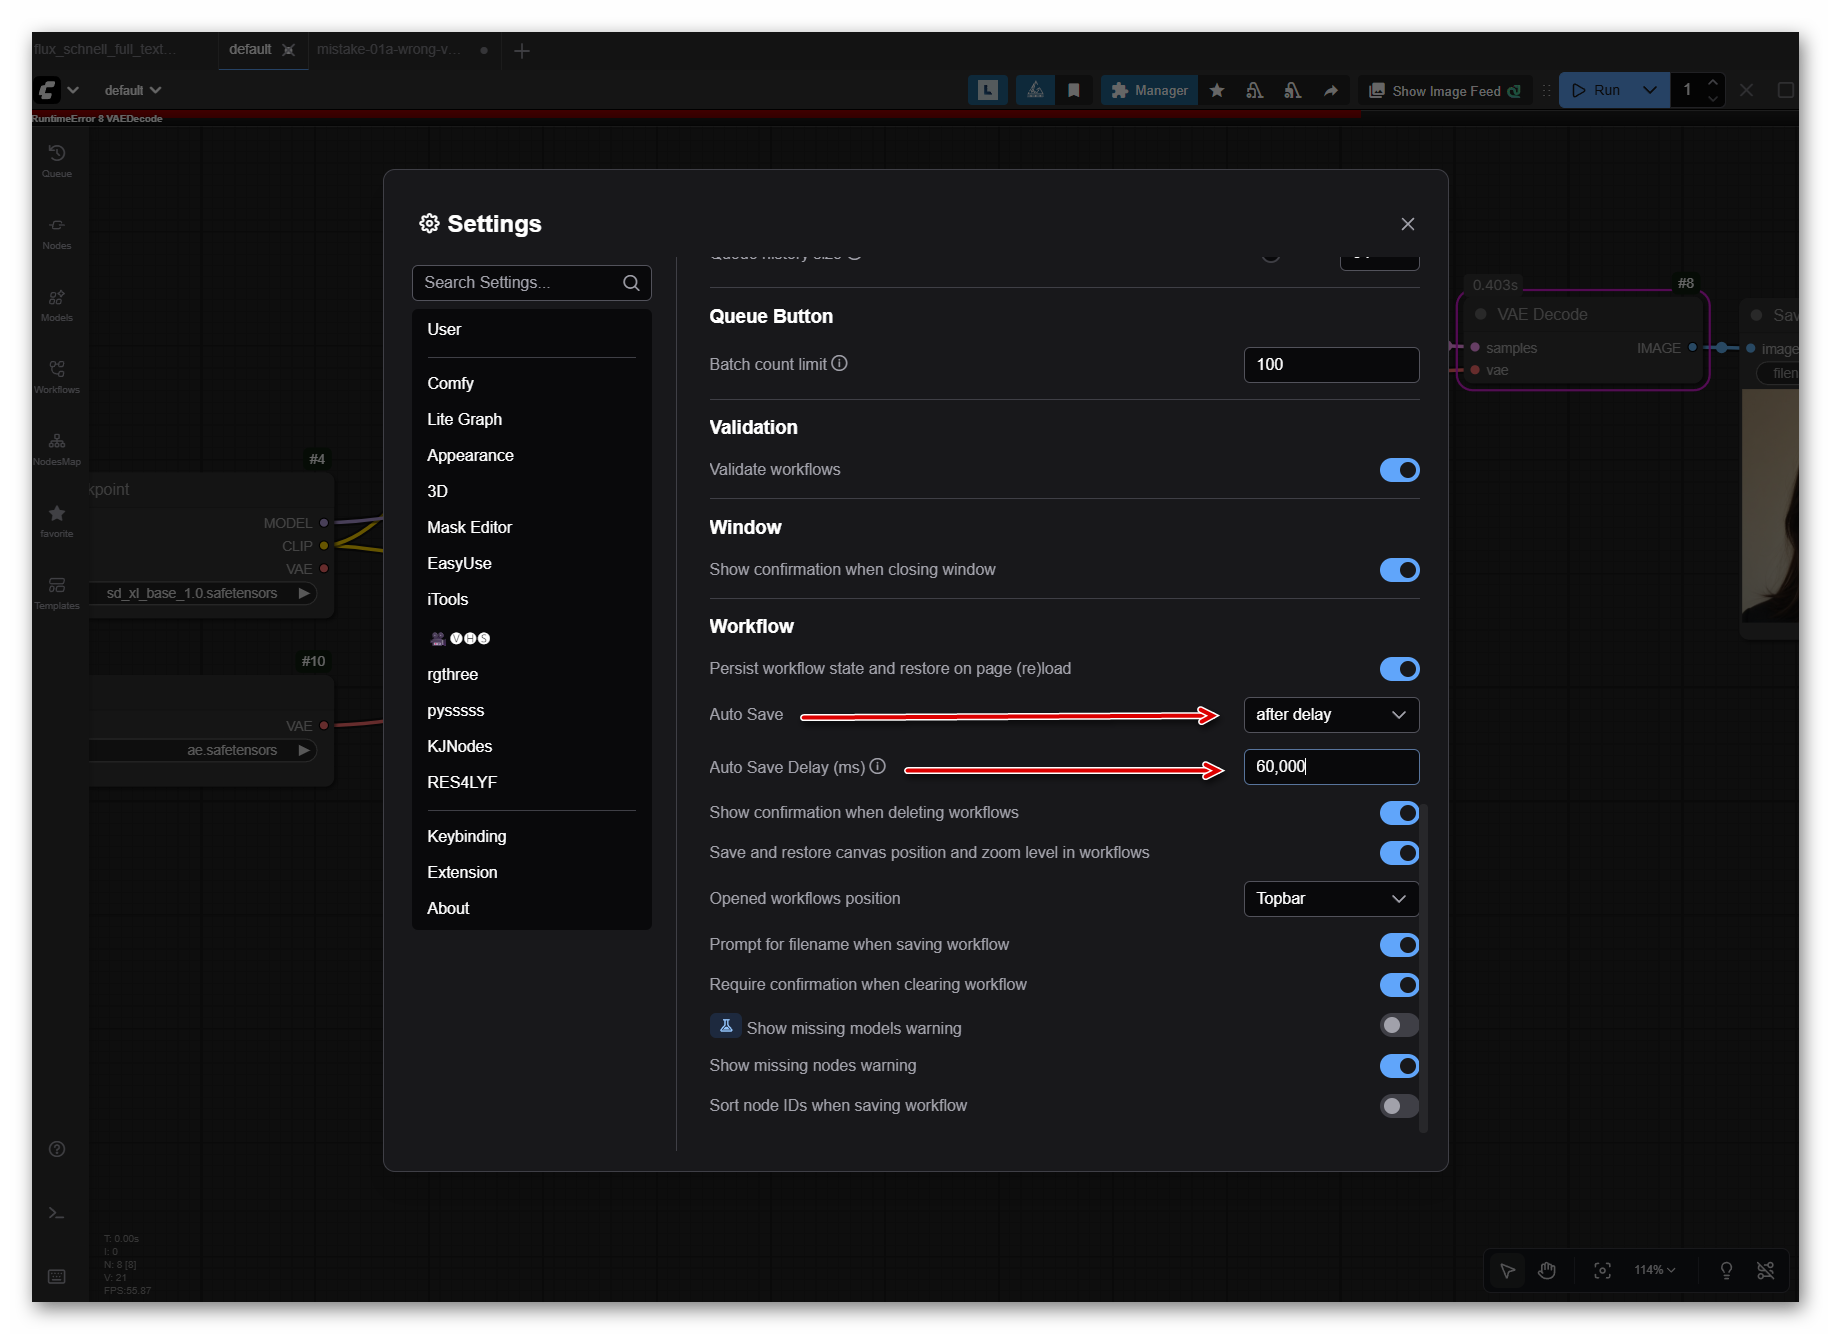
Enable Auto-Save (Recommended):
ComfyUI now includes an auto-save feature that prevents lost work:
- Click the gear icon (Settings) in ComfyUI’s top menu
- Find the “Auto-Save Workflows” option
- Enable it and set an interval (recommended: 2-5 minutes)
- Your workflows now save automatically
Important: Auto-save uses browser storage (can be cleared). Still manually save important workflows to JSON files for:
- Version control and backups
- Sharing workflows with others
- Permanent storage outside the browser
- Working across different computers
Best Practice: Enable auto-save for crash protection AND manually save (Ctrl+S) for important versions.
Workflow Versioning:
Don’t overwrite your working workflows. Save versions:
portrait-v1.json(basic version)portrait-v2.json(added upscaling)portrait-v3-working.json(current iteration)
This way you can always go back to a working version if you break something.
Pro Tip: After every major change that works, hit Ctrl+S immediately. Make it a reflex. Future you will thank past you.
Mistake #3: Using the Wrong Resolution for Your Model
The Mistake
You are generating images at 512x512 with an SDXL model. Or 1024x1024 with an SD1.5 model. The images come out weird. Distorted. Multiple heads. Mangled limbs. Wrong aspect ratios.

Why This Happens
Models are trained on specific resolutions and total pixel counts:
- SD1.5: Trained on 512x512 (262,144 pixels)
- SDXL: Trained on ~1 megapixel total (not locked to 1024x1024 square)
- Flux: Trained on 1024x1024 and higher
Generate at vastly different pixel counts or wrong aspect ratios, and the model gets confused. It is trying to cram details meant for one resolution into another. Results: visual chaos.
Important for SDXL: The model was trained on ~1,000,000 total pixels across various aspect ratios, not specifically 1024x1024. This means 896x1152, 832x1216, and other resolutions near 1MP work equally well depending on your subject and composition.
How to Fix It
Match Your Resolution to Your Model:
Using SD1.5?
- Base resolution: 512x512
- Safe range: 512x768, 768x512, 640x640
- Avoid: Anything over 768px in any dimension
Using SDXL?
SDXL was trained on ~1 megapixel total, not locked to square format. Choose a resolution based on your subject:
- Square (1:1): 1024x1024 (~1MP)
- Portrait (3:4): 896x1152 (~1MP)
- Landscape (4:3): 1152x896 (~1MP)
- Tall portrait (9:16): 832x1216 (~1MP)
- Wide landscape (16:9): 1216x832 (~1MP)
The principle: Aim for ~1,000,000 total pixels. Avoid going too far below (768x768 = 589k) or too far above (1536x1536 = 2.36M) for the best results.
Using Flux?
- Base resolution: 1024x1024 minimum
- Safe range: 1024x1024 up to 2048x2048+
- Works well: Higher resolutions than SDXL
Aspect Ratios:
Stick to common aspect ratios:
- 1:1 (square)
- 3:4 or 4:3 (portrait/landscape)
- 9:16 or 16:9 (phone/widescreen)
Weird aspect ratios (like 512x1234) will give weird results.
Pro Tip: Start at the base resolution for your model. Once it works, experiment with safe variations. Don’t go wild with resolution until you understand what you’re doing.
Mistake #4: Running Out of VRAM (and Not Knowing Why)
The Mistake
Everything’s working fine, then suddenly:
- “CUDA out of memory” error
- Black images
- ComfyUI crashes
- Your GPU fans sound like a jet engine
You didn’t change anything big, but now nothing works.
Why This Happens
ComfyUI loads everything into VRAM:
- The checkpoint model (2-6GB)
- The VAE (100-300MB)
- LoRAs (50-200MB each)
- ControlNet models (1-5GB each)
- The generated images during processing
Add it all up, and you easily exceed 8GB, 12GB, or even 16GB VRAM.
Beginners do not realize that:
- FP16 models use 2x the VRAM of FP8 models
- Loading multiple LoRAs stacks up
- Batch generation multiplies VRAM usage
- Some nodes keep old images in memory
How to Fix It
Immediate Fixes:
1. Use FP8 Models Instead of FP16
flux1-dev-fp8.safetensors(17GB) uses around 11GB VRAMflux1-dev-fp16.safetensors(24GB) uses around 20GB VRAM- FP8 = half the VRAM, minimal quality loss
2. Generate One Image at a Time
- Batch size = 1
- Don’t queue multiple prompts simultaneously
3. Close Other GPU Applications
- Chrome/Firefox with hardware acceleration enabled
- Other AI tools
- Games running in the background
4. Reduce Image Resolution Temporarily
- Test at 512x512 or 768x768 first
- Upscale separately after it works
5. Restart ComfyUI Between Big Changes
- Unloads everything from VRAM
- Fresh start = fresh memory allocation
Long-term Solutions:
Use —lowvram or —normalvram flags:
Add to your ComfyUI launch command:
python main.py --lowvram
This streams models to VRAM as needed instead of loading everything at once.
Upgrade Hardware (if possible):
- 8GB VRAM: Can run SD1.5, SDXL (tight), Flux FP8 (very tight)
- 12GB VRAM: Comfortable for SDXL, workable for Flux
- 16GB+ VRAM: Smooth sailing for everything
Pro Tip: Install GPU-Z or similar monitoring tool. Watch your VRAM usage in real-time. When it hits 90-95%, you’re about to crash. Adjust before you hit the limit.
Mistake #5: Using the Wrong CFG Scale (Especially with Flux)
The Mistake
Your Flux images look terrible. Over-saturated, fried, or completely off. Or your SD1.5 images are washed out and ignore your prompt.
You are using CFG 7.0 on Flux. Or CFG 1.0 on Stable Diffusion. Either way, it is wrong.

Why This Happens
CFG (Classifier-Free Guidance) scale controls how strongly the model follows your prompt.
Different model families need different CFG values:
- Flux models: Designed to work at CFG 1.0-1.5 range (baseline: 1.0)
- SD1.5/SDXL: Need CFG 6.0-8.0 to follow prompts properly
Use the wrong CFG and you break the model’s intended behavior.
Flux at CFG 7.0+: Completely breaks generation, over-emphasizes features, destroys quality
SD at CFG 1.0: Ignores your prompt, generates random images
How to Fix It
Know Your Model Type:
Using Flux?
- CFG: 1.0-1.5 range (start at 1.0)
- CFG 1.0: Simple prompts, single subjects
- CFG 1.2-1.4: When using negative prompts or quality keywords
- CFG 1.5+: Experimental (may reduce realism)
- Never use: CFG 7.0+ breaks Flux completely
Flux Guidance (The Main Control):
Flux models use a separate Flux Guidance parameter that works like CFG does for other models. This is the PRIMARY way to control prompt adherence in Flux.
- Flux Guidance: 2.5-4.0 range (default: 3.5)
- Short prompts: ~4.0 (stronger adherence)
- Long/creative prompts: 1.0-2.5 (more freedom)
- Applied via: FluxGuidance node (connects to conditioning, not KSampler)
Why Flux has both parameters:
- CFG stays low (1.0-1.5) because Flux has “distilled guidance” built-in
- Flux Guidance provides fine-tuning control on top of that
- Think of CFG as the baseline, Flux Guidance as the main dial
Note: Flux Schnell doesn’t use the Flux Guidance node (fixed guidance for speed). This is mainly for Flux.1-Dev.
Using SD1.5?
- CFG: 6.0-8.0 (sweet spot: 7.0 for classic models)
- Lower (4-6): More creative freedom, looser interpretation
- Higher (8-12): Stricter prompt following, can over-saturate
Using SDXL?
- CFG: Varies by model type (not a fixed value!)
- Classic SDXL: 6.0-8.0 (sweet spot: 7.0-7.5)
- SDXL Turbo / DMD2 merges: 1.0-5.0 (lower is often better)
- Check model card: Creators specify optimal CFG
What CFG Actually Controls:
- Low CFG (1-5): Model has creative freedom, loosely follows prompt (ideal for some SDXL merges)
- Medium CFG (6-8): Balanced prompt following (classic SD1.5/SDXL)
- High CFG (9-12): Strictly follows prompt, less variation
- Too high (13+): Over-saturated, fried, unnatural images
Important: CFG is not a universal constant. Classic “CFG 7” comes from SD 1.5 defaults. SDXL and merged models (especially DMD2 or SDXL Turbo derivatives) often perform better at CFG 1-5. Always check the model card for recommended settings.
Pro Tip: When you load a workflow from online, check the CFG immediately. If it’s a Flux workflow with CFG above 2.0, change it to 1.0-1.5 range before generating. CFG 7.0+ will completely break Flux output.
Mistake #6: Copying Workflows Without Understanding Them
The Mistake
You download an amazing workflow from Reddit or Civitai. It works perfectly until it does not. Then you have no idea how to fix it or modify it for your needs.

Why This Happens
It is tempting to copy workflows that “just work.” You want results fast. Why learn when you can download?
The problem: When something breaks (and it will), you are helpless:
- Cannot troubleshoot errors
- Cannot modify for different use cases
- Cannot understand why it worked in the first place
- End up asking for help with basic issues
You are using a tool you do not understand.
How to Fix It
Build the Foundation First:
Start with a basic workflow
- Load Checkpoint, CLIP Text Encode, KSampler, VAE Decode, Save Image
- Understand what each node does
- Generate a working image
Add one feature at a time
- Want upscaling? Add upscale nodes
- Want LoRA? Add LoRA loader
- Want ControlNet? Add ControlNet nodes
- Test after each addition
Study complex workflows piece by piece
- Don’t just load and run
- Identify sections: input, processing, output
- Trace data flow from left to right
- Ask “why is this node here?”
Modify before copying
- Change the prompt
- Swap the model
- Adjust settings
- Break it intentionally and fix it
The 5-Minute Rule:
Before using any workflow, spend 5 minutes identifying:
- What model it needs
- What custom nodes it requires
- What it is designed to do
- How you would modify it for your use
Pro Tip: Our ComfyUI tutorials teach you to build workflows from scratch, understanding each node’s purpose. You will be able to troubleshoot any workflow and build your own from scratch.
Mistake #7: Using Too Many or Too Few Steps
The Mistake
You are generating at 150 steps because “more is better,” and each image takes 3 minutes. Or you are using 10 steps and wondering why quality is terrible.
Why This Happens
There is a sweet spot for steps. Too few = undercooked, blurry, incomplete. Too much = wasted time with minimal quality improvement.
Beginners either:
- Use default settings (often too low) without thinking
- Assume “more steps = better quality” (not true after a certain point)
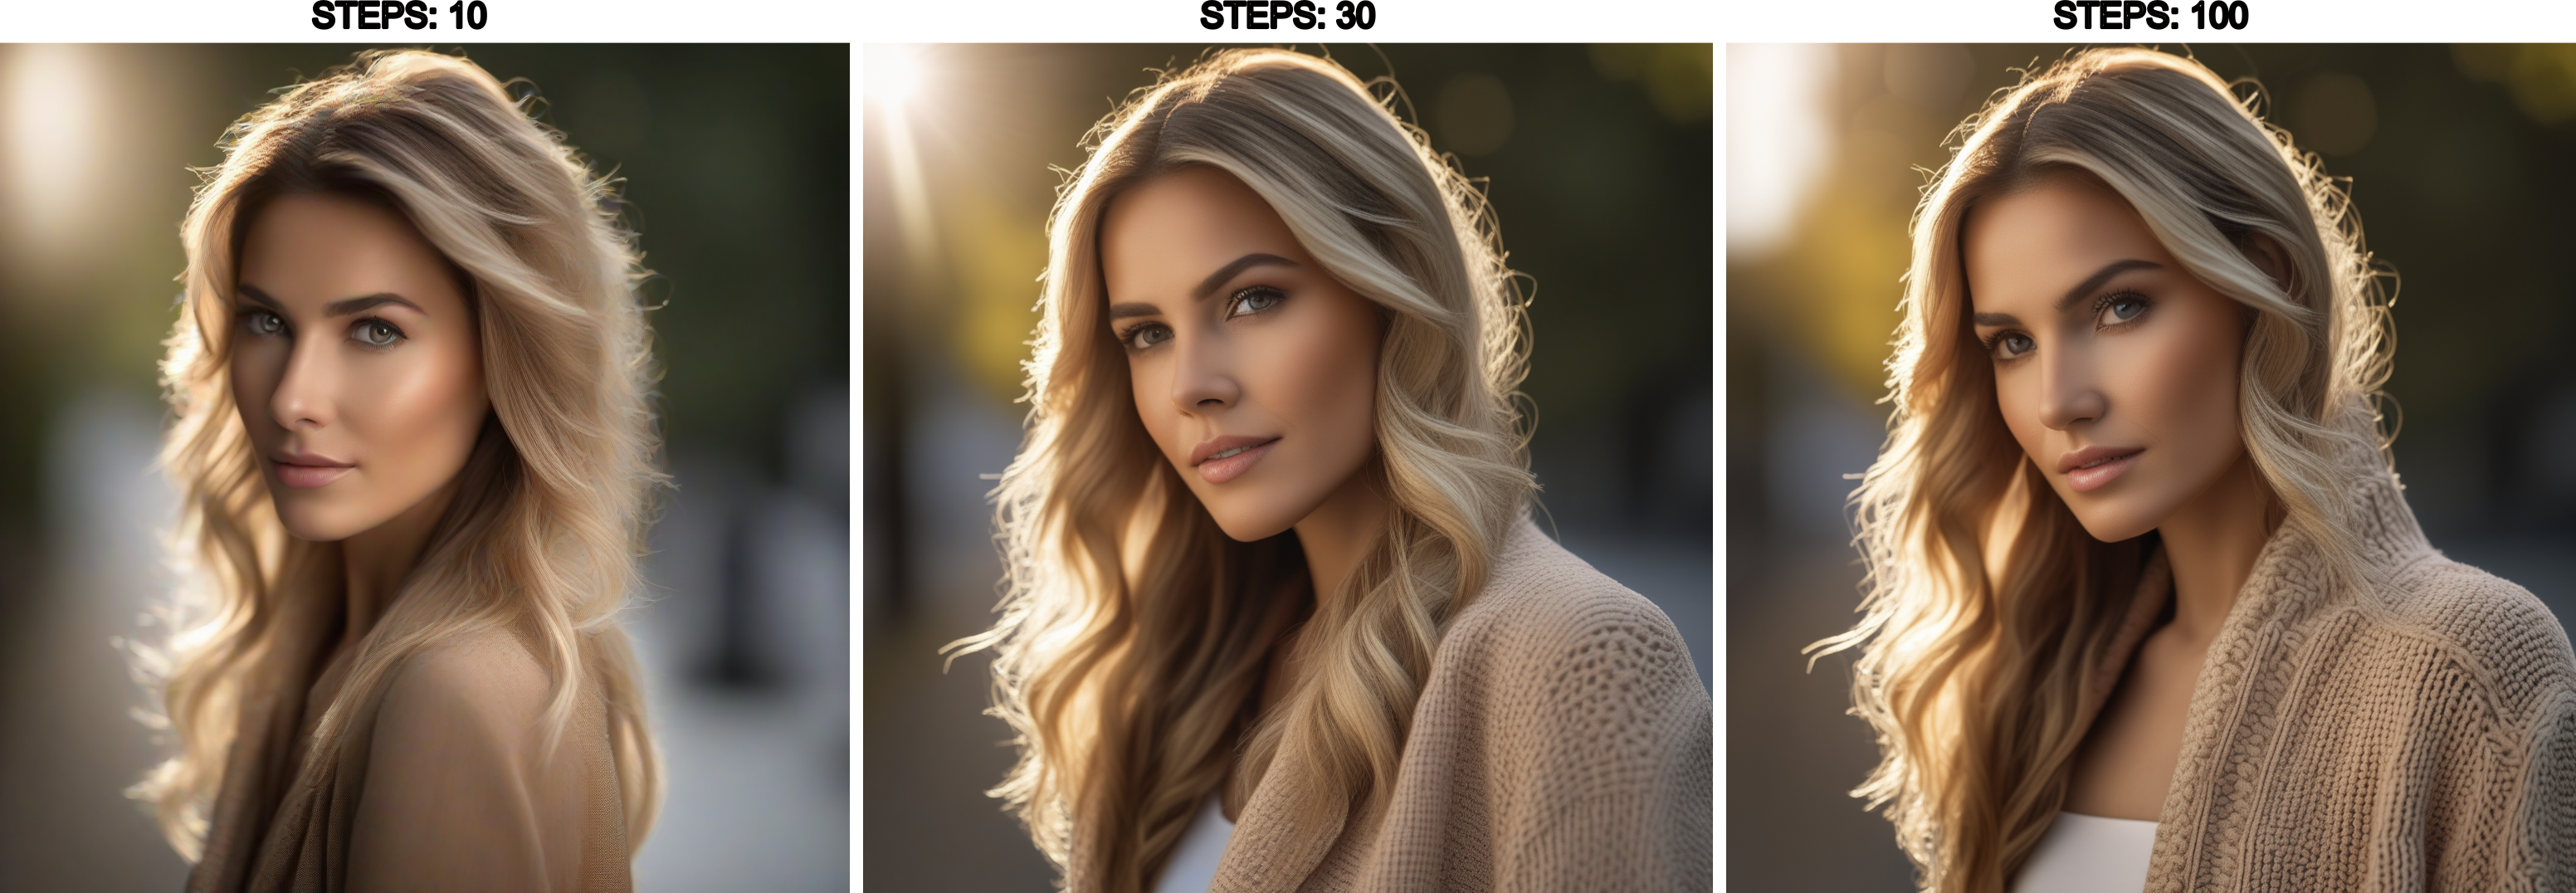
The Law of Diminishing Returns:
- Steps 1-15: Rapid quality improvement
- Steps 15-30: Noticeable refinement
- Steps 30-50: Subtle improvements
- Steps 50+: Barely visible differences, 2-3x longer generation time
How to Fix It
Note: These are general guidelines for standard models. Step count varies significantly between models, samplers, and schedulers:
- DPM++ samplers often converge faster than Euler A
- SDXL Turbo and DMD2 merges can produce sharp results in as few as 4-10 steps
- Some fine-tuned models have optimal step counts specified in their model cards
- Always check the model card for creator-recommended settings
Recommended Step Counts (General Guidelines):
SD1.5 (Classic Models):
- Sweet spot: 20-30 steps (most models)
- Fast draft: 15-20 steps
- High quality: 30-40 steps
- Specialized merges: May need fewer (check model card)
- Waste of time: 60+ steps
SDXL (Classic Models):
- Sweet spot: 30-40 steps (most models)
- Fast draft: 20-25 steps
- High quality: 40-50 steps
- Turbo/DMD2 variants: 4-10 steps (much faster)
- Waste of time: 70+ steps for standard models
Flux:
- Sweet spot: 20-28 steps
- Fast draft: 15-20 steps
- High quality: 28-35 steps
- Waste of time: 50+ steps
How to Find Your Sweet Spot:
- Generate same prompt at 10, 20, 30, 40, 60 steps
- Compare quality improvements
- Find where improvements become negligible
- Use that as your default
Pro Tip: For testing prompts and compositions, use fewer steps (15-20). For final renders, use your model’s sweet spot. Don’t waste 3 minutes per image when testing.
Mistake #8: Not Updating ComfyUI or Custom Nodes
The Mistake
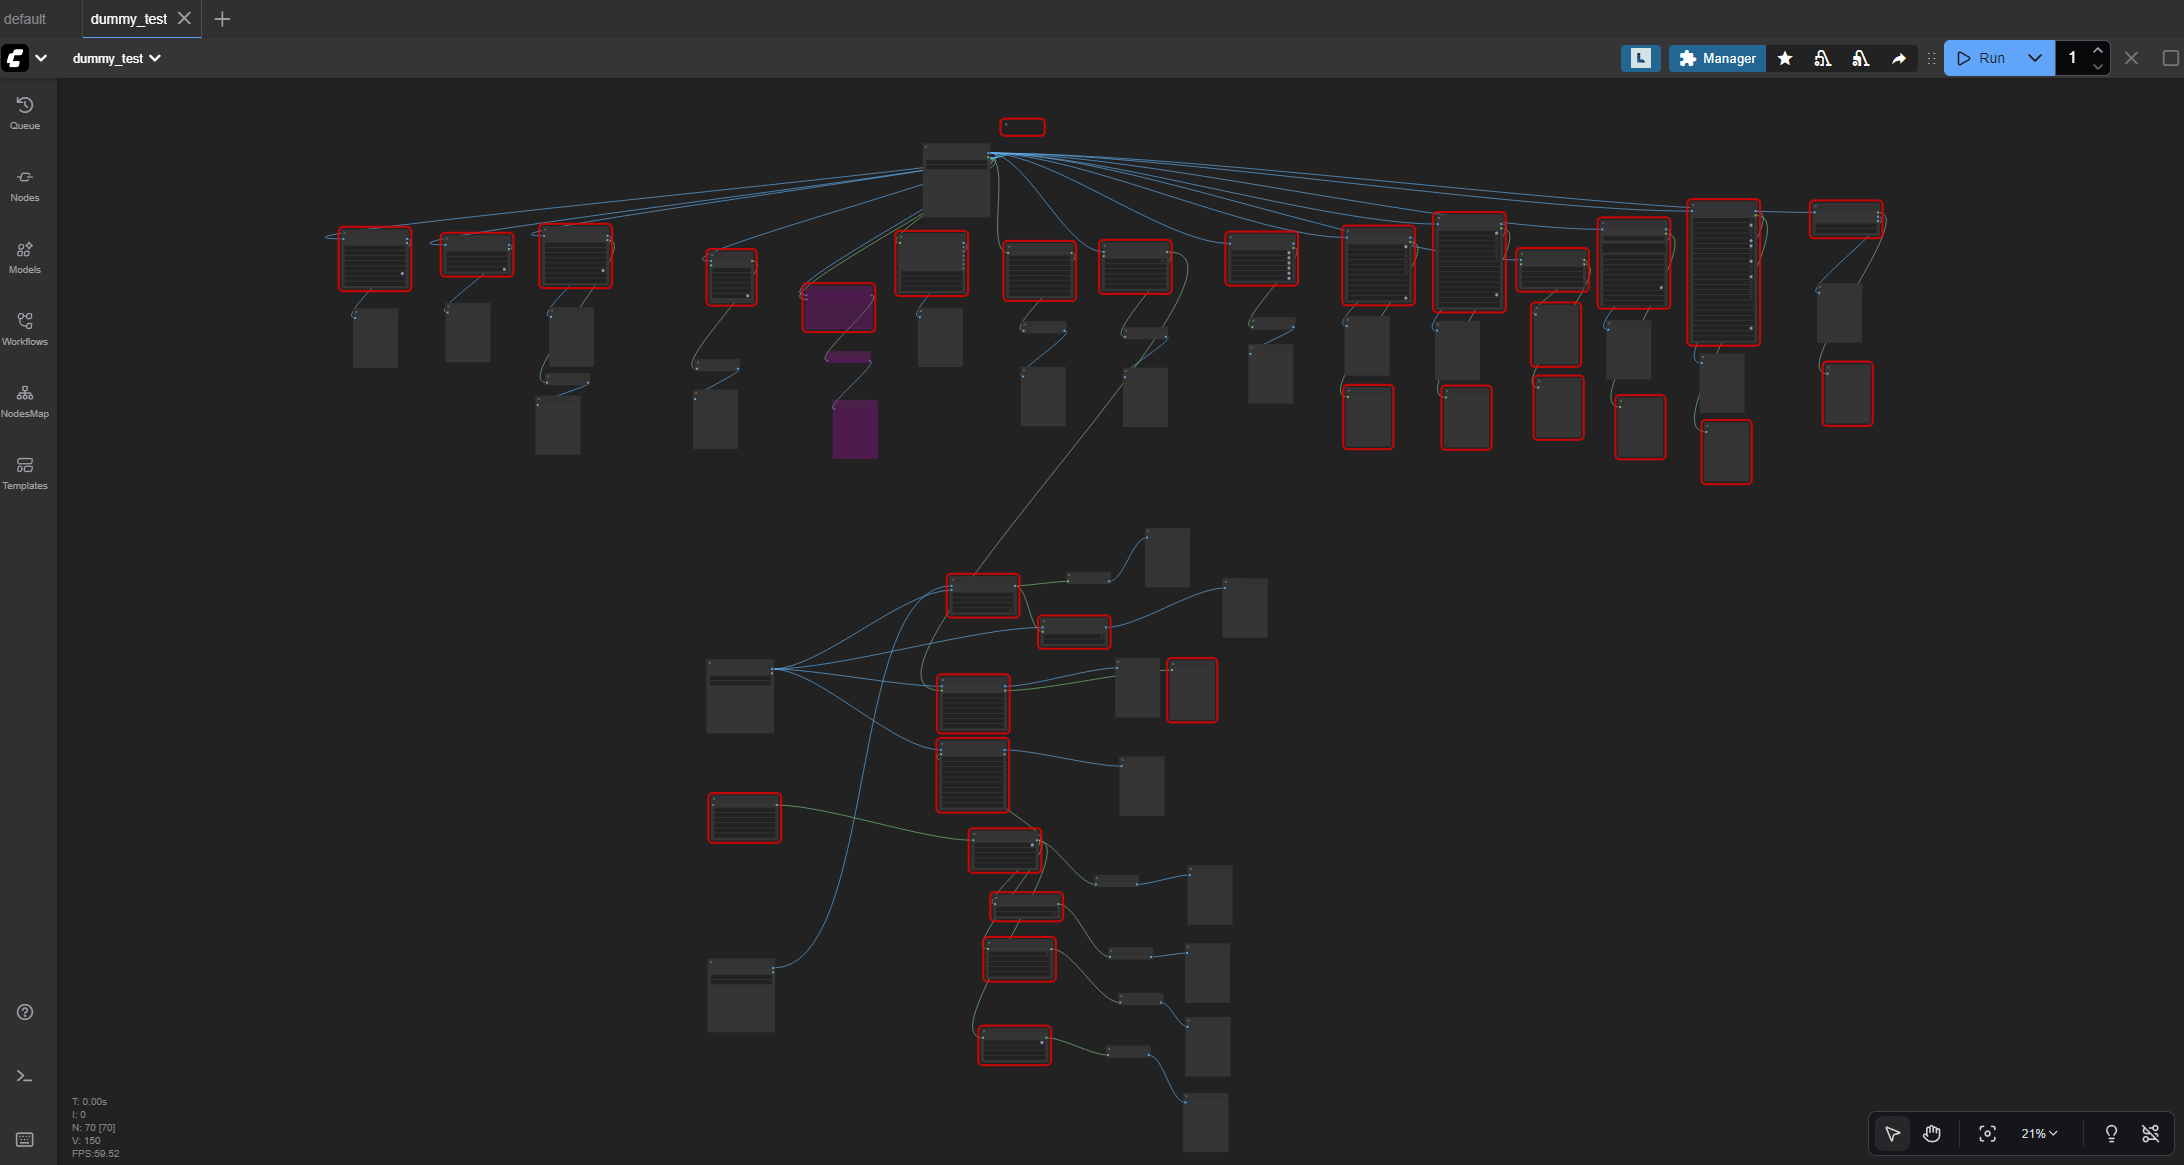
You load a workflow from last month. Red error nodes everywhere. Nothing works. The custom nodes you installed stopped functioning. You get weird errors.
Why This Happens
ComfyUI develops fast. Custom nodes update even faster. A workflow that worked 2 months ago might not work today because:
- ComfyUI core changed
- Custom nodes updated their API
- New features made old nodes obsolete
- Dependencies changed
Beginners install ComfyUI once and never update. Then workflows break and they do not know why.
How to Fix It
Update Regularly (Monthly Minimum):
1. Update ComfyUI Core:
cd ComfyUI
git pull
Or if you use a portable version: Download the latest release
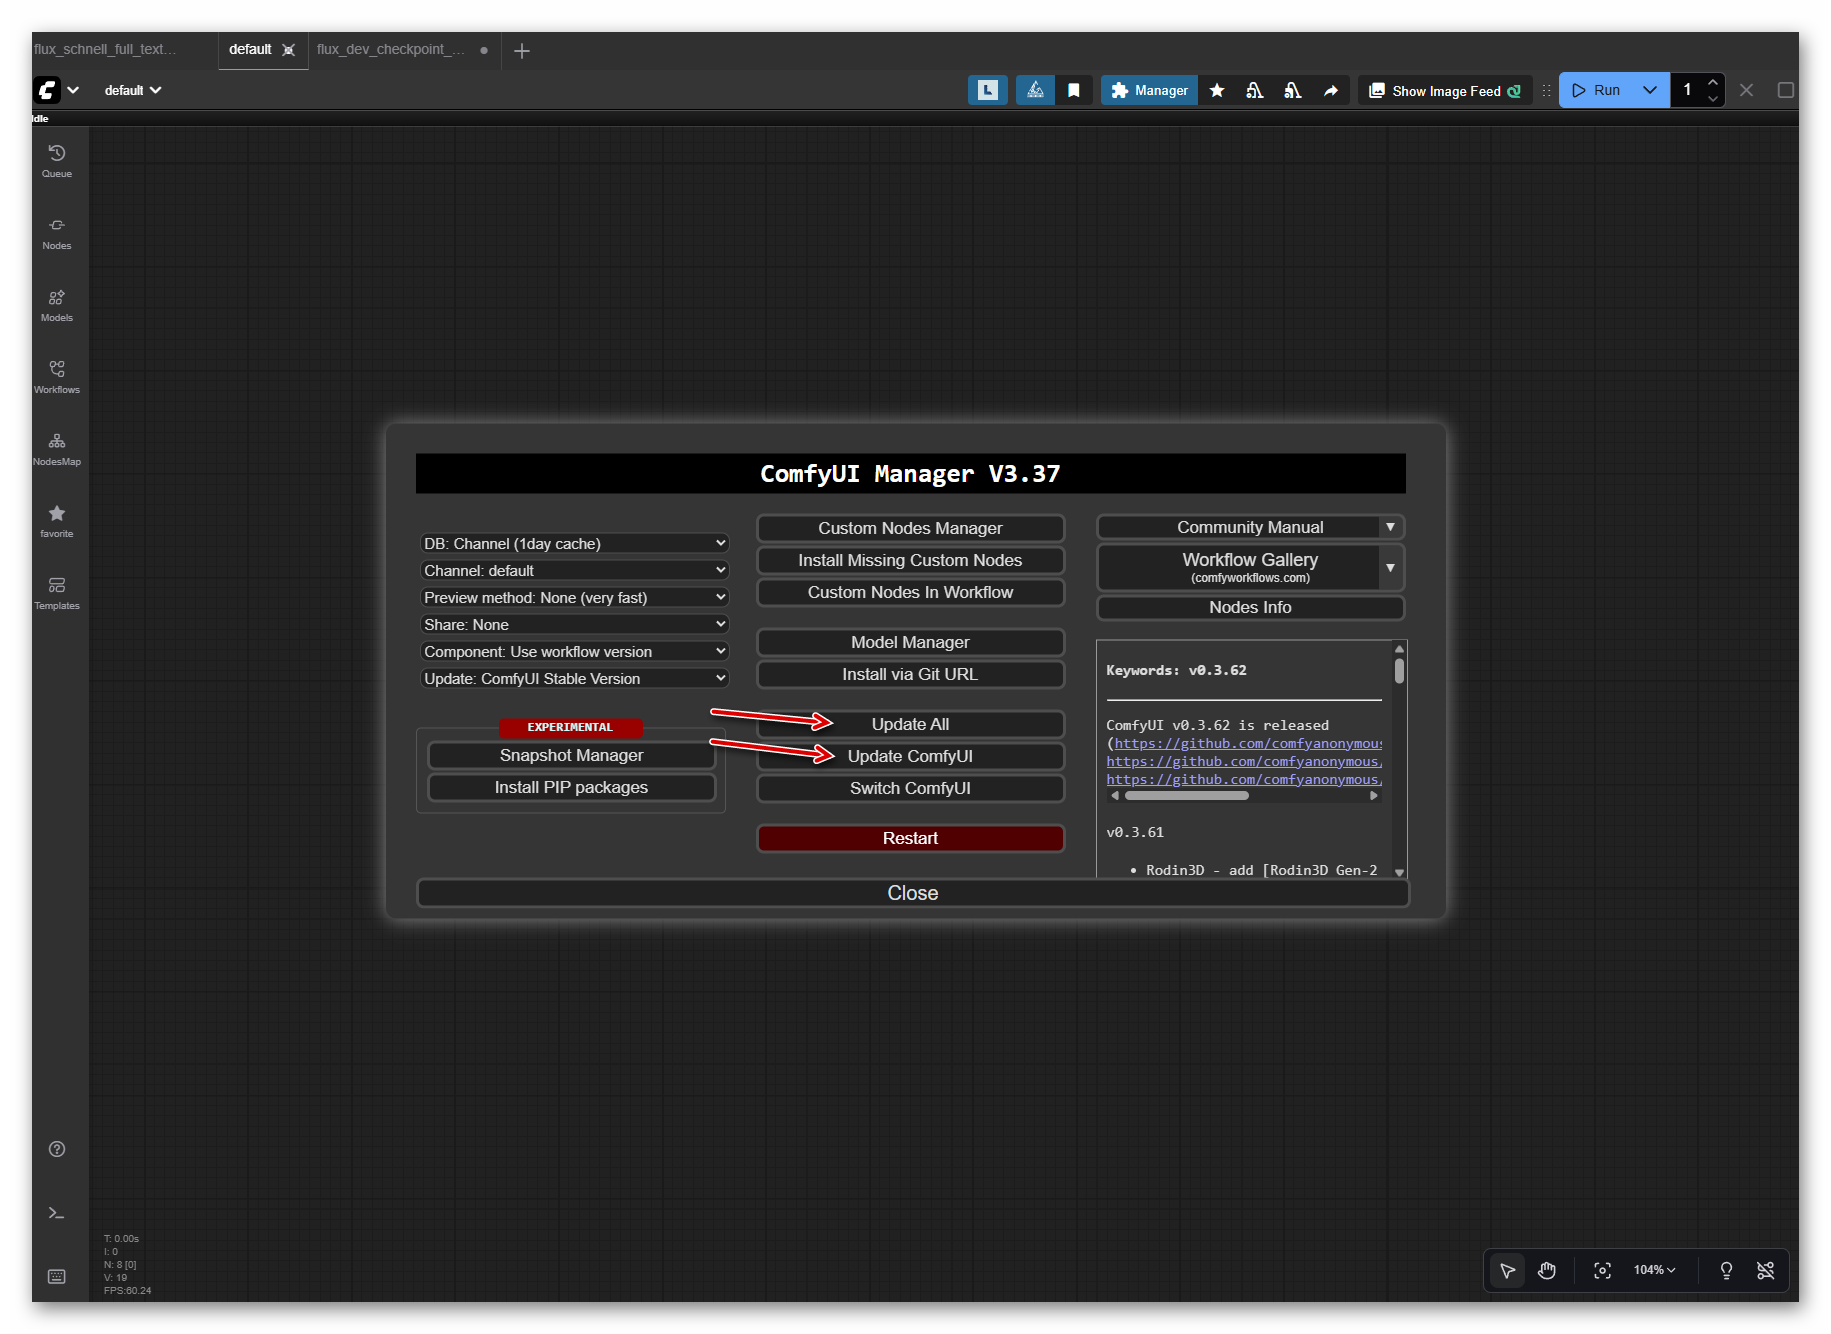
2. Update Custom Nodes via Manager:
- Open ComfyUI Manager (icon in menu)
- Click “Update All”
- Restart ComfyUI
- Test your workflows
3. Check for Breaking Changes:
- Read update notes
- Some updates change node names or inputs
- Your existing workflows might need adjustments
Before Major Projects:
- Update everything first
- Test your critical workflows
- If something breaks, you know it is the update
- Can roll back if needed
Pro Tip: Do not update right before a deadline. Update when you have time to test and fix any issues. Keep a backup of your working ComfyUI folder.
Mistake #9: Ignoring the Seed (Cannot Reproduce Good Results)
The Mistake
You generate an amazing image. Perfect composition, lighting, style. You want to make variations but cannot remember the seed. Every new generation is completely different.
Why This Happens
The seed controls the “random” starting point for generation. The same seed plus the same settings plus the same prompt equals the same image (usually).
Beginners use “random seed” for everything and do not note the seed when they get good results. They cannot:
- Generate variations of a good image
- Reproduce a result to fix small issues
- Test what changed when tweaking prompts
- Share reproducible results with others
How to Fix It
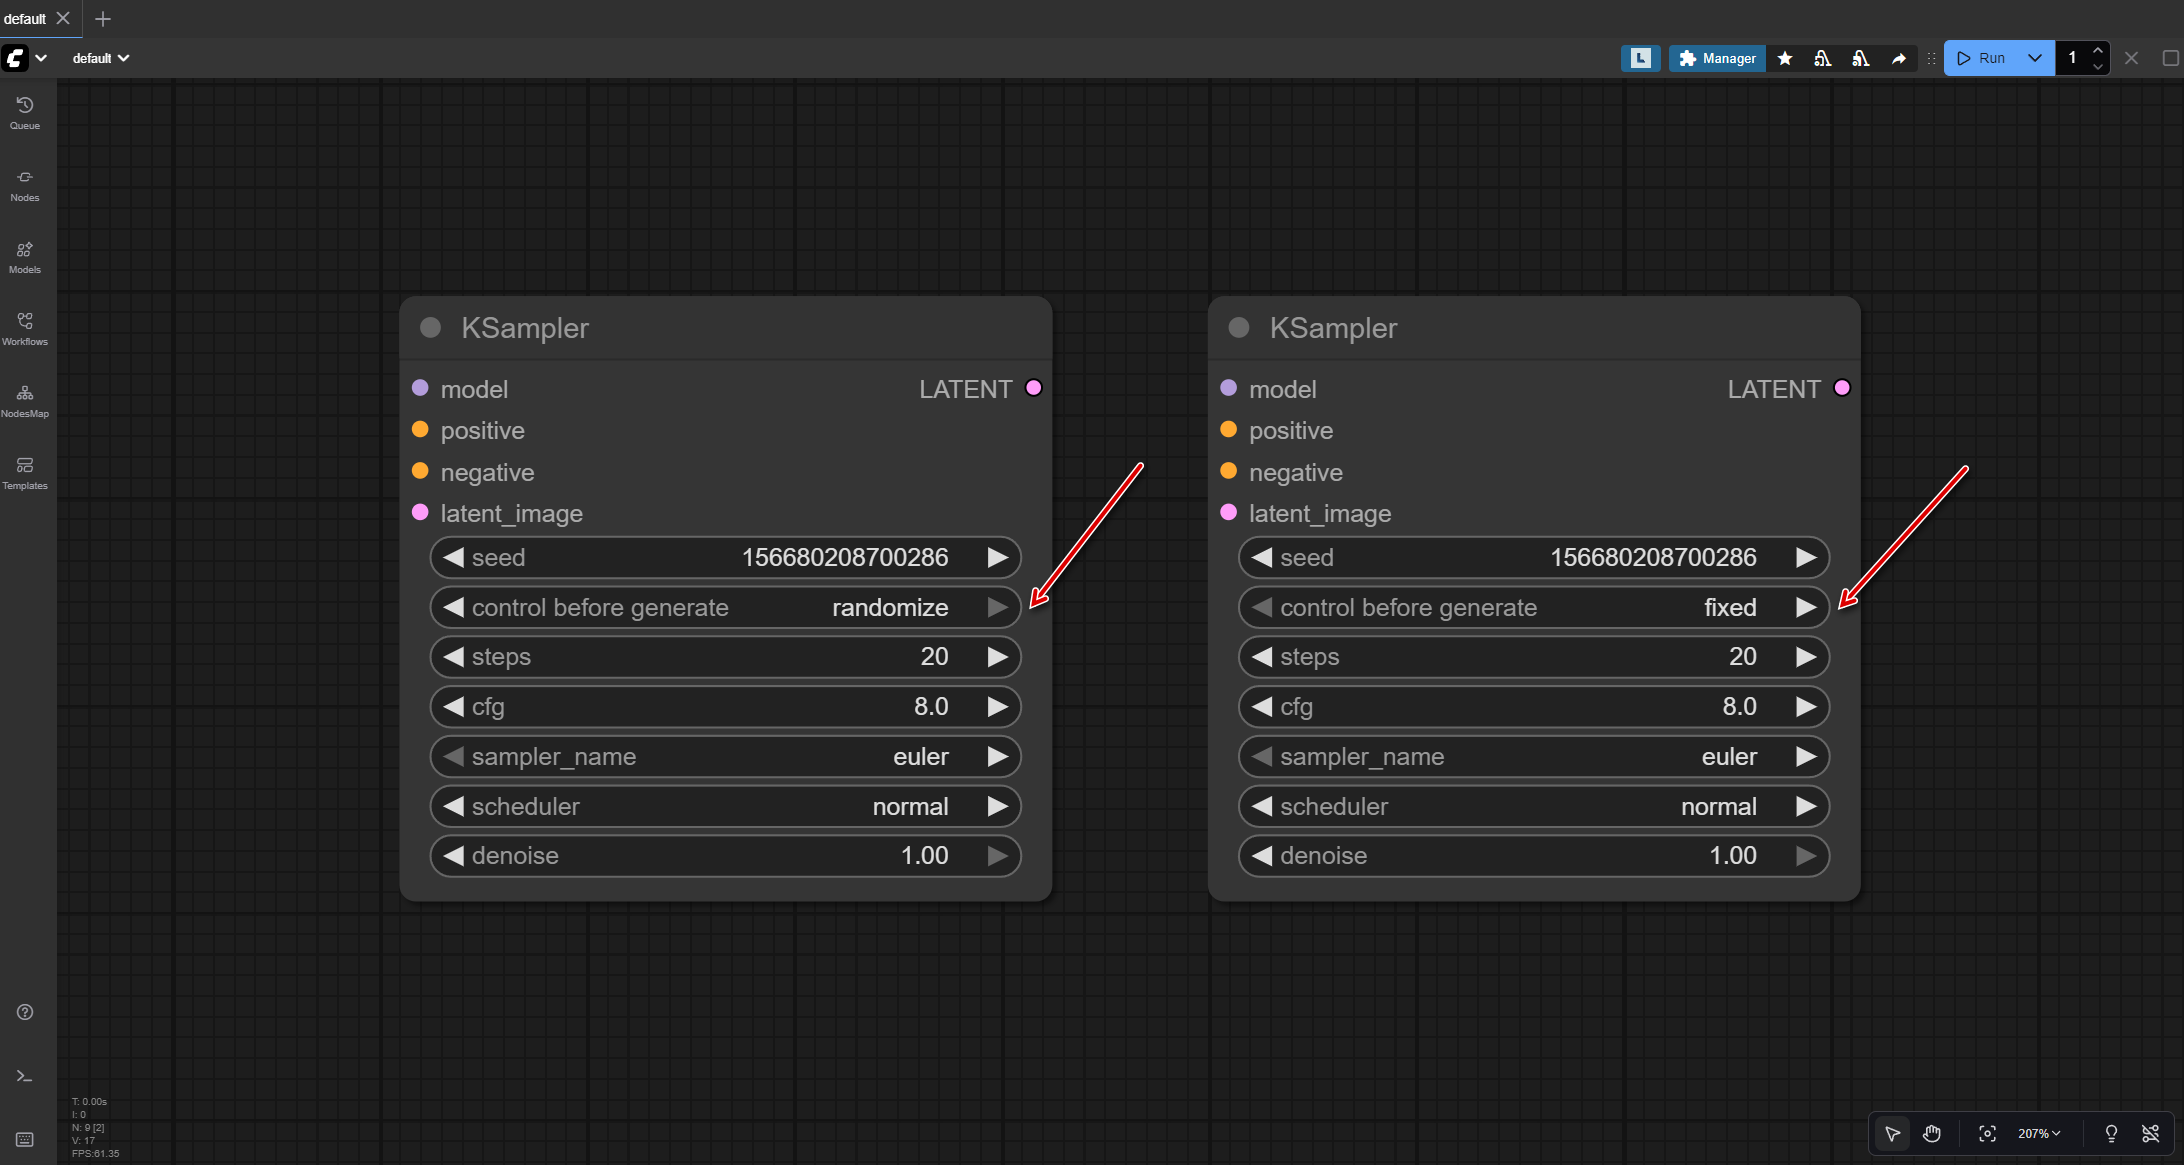
Understand Seed Behavior:
Random Seed (default):
- Every generation uses a new random seed
- Results are unpredictable
- Good for exploration and variety
Fixed Seed:
- Same seed every time
- Reproducible results
- Good for testing changes
How to Use Seeds Effectively:
1. Exploration Phase (Random Seed):
- Keep seed on “randomize” or “-1”
- Generate lots of variations
- When you get something good, note the seed
2. Refinement Phase (Fixed Seed):
- Set seed to the value that gave good results
- Lock it (set to ‘fixed’)
- Now tweak other parameters:
- Adjust prompt
- Change CFG
- Modify steps
- Add LoRAs
- See exactly how each change affects the output
3. Variation Phase (Same Seed + Parameter Changes):
- Keep the SAME seed that works (don’t change it!)
- Modify prompts: add/remove descriptors, change styles
- Adjust LoRA weights: increase/decrease influence
- Tweak CFG or steps slightly
- This creates actual controlled variations of your composition
- For character sheets: same seed, different expressions/poses in prompt
Where to Find the Seed:
ComfyUI automatically embeds all workflow data (prompt, seed, sampler, steps, CFG, etc.) in PNG or WebP metadata. You can:
- View in console: After generation, the seed displays in the console output
- Check image metadata: Right-click generated image → View metadata
- Reload workflow: Drag the saved image back into ComfyUI to instantly recreate the exact workflow
No manual saving needed - it’s already embedded!
Pro Tip: Create a text file
notes.txtin your ‘outputs’ folder. When you generate a great image, immediately paste: prompt, seed, model, and settings. You will thank yourself later.
Mistake #10: Missing Required Custom Nodes (Red Error Nodes)
The Mistake
You download an awesome workflow from Civitai. Load it into ComfyUI. The canvas fills with scary red error nodes. Nothing works. You have no idea what’s missing.
Why This Happens
Many workflows use custom nodes that are not built into ComfyUI:
- ComfyUI-Impact-Pack
- ComfyUI-Manager
- ControlNet Preprocessors
- IP-Adapter nodes
- Hundreds of others
When you load a workflow that uses custom nodes, you have not installed:
- Nodes show up in red
- Workflow will not execute
- Error messages mention missing node types
Beginners often don’t realize custom nodes exist or how to install them.
How to Fix It
Installing ComfyUI Manager (If You Do Not Have It):
- Navigate to
ComfyUI/custom_nodesfolder - Clone the manager:
git clone https://github.com/ltdrdata/ComfyUI-Manager.git
- Restart ComfyUI
- Manager icon appears in the menu
Installing Missing Nodes:
Method 1: Let ComfyUI Manager Auto-Install
- Load the workflow with red nodes
- ComfyUI Manager detects missing nodes
- Click “Install Missing Nodes”
- Restart ComfyUI
- Reload workflow
Method 2: Manual Installation
- Check workflow description/README
- Lists required custom nodes
- Install via ComfyUI Manager (search node name)
- Or clone to the custom_nodes folder
- Restart ComfyUI
Method 3: Read Error Messages
Red nodes show the missing node type name. Example:
- “ComfyUI-Impact-Pack: DetailerForEach”
- Search that name in ComfyUI Manager
- Install the pack
- Restart
Before Downloading Workflows:
Check the description/README for:
- Required custom nodes (listed)
- Model requirements (which checkpoint)
- VRAM requirements (can you run it?)
- ComfyUI version needed
Pro Tip: Install these essential custom node packs first, before you need them:
- ComfyUI-Manager (for managing other nodes)
- ComfyUI-Impact-Pack (common utilities)
- ComfyUI-ControlNet-Aux (preprocessors)
- ComfyUI-Easy-Use (simplified workflow building)
This covers 80% of popular workflows and makes workflow creation easier.
Common Error Messages and What They Mean
Even when you avoid the 10 mistakes above, you will encounter error messages. Here is how to decode the most common ones.
”Value not in list: ckpt_name”
Error Message:
Prompt execution failed
Prompt outputs failed validation:
CheckpointLoaderSimple:
- Value not in list: ckpt_name: 'sd_xl_base_1.0.safetensors' not in [...]
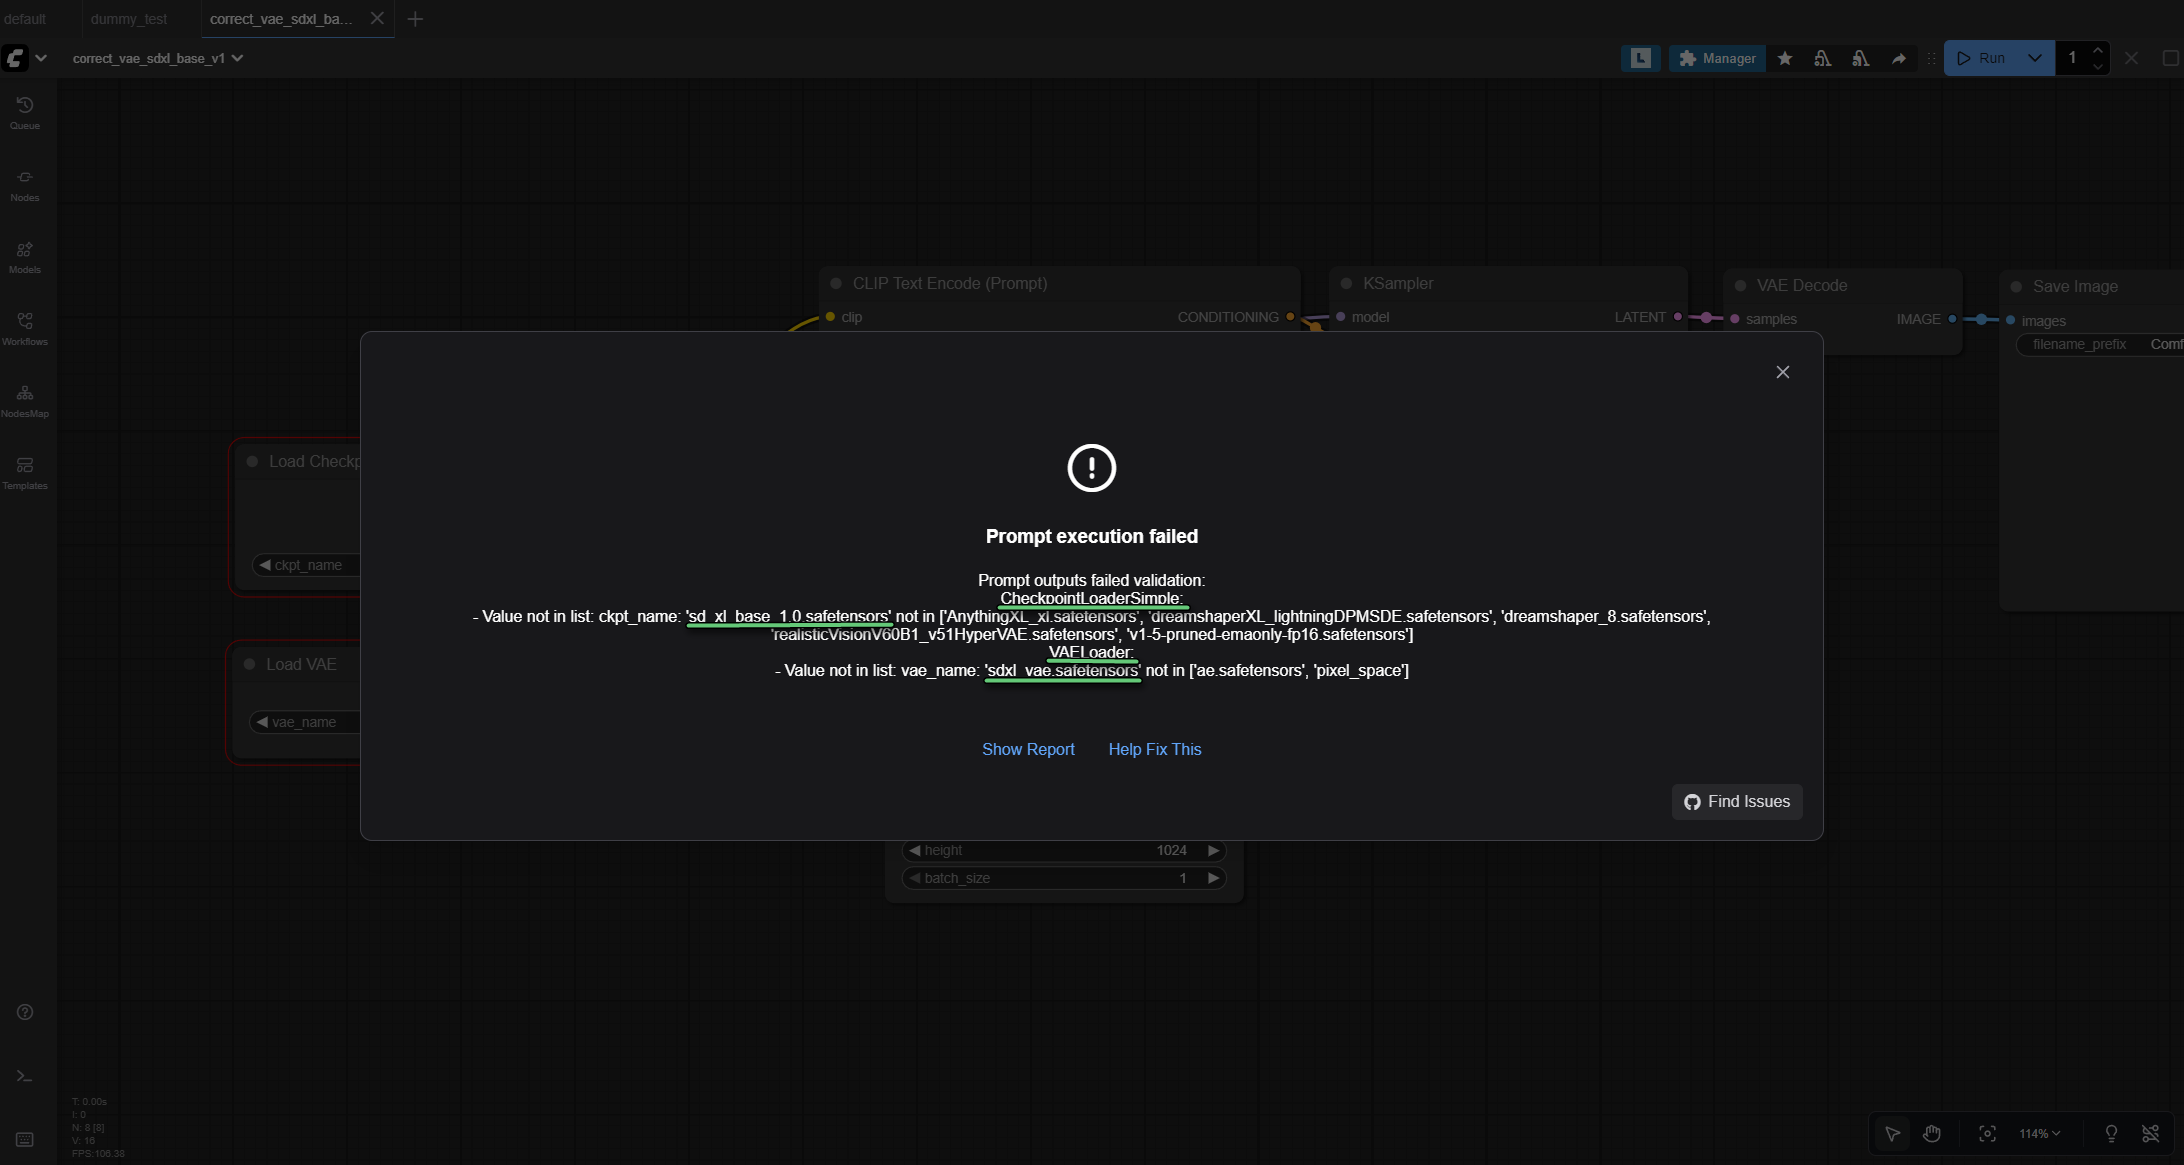
What It Means:
The workflow is looking for a specific checkpoint (model) file that you do not have. The workflow was created on another system with different models, or the checkpoint was renamed or moved.
Why This Happens:
- You downloaded a workflow that references models you do not own
- Someone shared a workflow without listing required models
- You renamed a checkpoint file after creating the workflow
- Checkpoint is in the wrong folder or not detected by ComfyUI
How to Fix It:
Option 1: Use a Model You Have
- Find the Load Checkpoint node in your workflow (the error calls it “CheckpointLoaderSimple”)
- Click the dropdown menu for
ckpt_name - The error message lists your available models - select one that matches the type
- For SDXL workflows → choose an SDXL model
- For SD1.5 workflows → choose an SD1.5 model
- For Flux workflows → choose a Flux model
Option 2: Download the Missing Model
- Check the workflow description or README for model requirements
- Download the exact checkpoint from Civitai or Hugging Face
- Place in
ComfyUI/models/checkpoints/ - Restart ComfyUI (or click refresh in the node dropdown)
- Select the newly downloaded model
Option 3: Fix the Model Path
- Verify your checkpoint files are in
ComfyUI/models/checkpoints/ - Make sure they have
.safetensorsor.ckptextension - Restart ComfyUI to refresh the model list
- Check the dropdown again
Pro Tip: Before loading any workflow, check what models it requires. Look for workflow descriptions that list “Required Models” - download them first before loading the workflow.
”Value not in list: vae_name”
Similar Error:
VAELoader:
- Value not in list: vae_name: 'sdxl_vae.safetensors' not in [...]
What It Means: Same issue, but for VAE files instead of checkpoints.
How to Fix:
- Check your
ComfyUI/models/vae/folder - Download the missing VAE (see Mistake #1 for VAE download links)
- Or select a VAE you do have from the dropdown
- Match VAE type to your model: SD1.5, SDXL, or Flux
What This Means for Your Learning Journey
These ten mistakes are not signs you are bad at ComfyUI. They are learning opportunities. Every expert has made every single one of these mistakes (probably multiple times).
The difference? Experts learned to:
- Match VAEs to models
- Save workflows compulsively
- Use appropriate resolutions and CFG values
- Manage VRAM proactively
- Set proper step counts
- Keep ComfyUI updated
- Use seeds strategically
- Install required custom nodes before they are needed
- Build understanding before copying workflows
You are not missing some secret knowledge. You are building pattern recognition. The more you encounter and fix these issues, the faster you spot them.

Quick Troubleshooting Checklist
Before asking for help, check:
- Did you load the correct VAE for your model?
- Did you save your workflow recently?
- Is your resolution appropriate for the model type?
- Is your VRAM usage below 90%?
- Is CFG set correctly? (Flux=1.0-1.5, SD1.5=7.0, Classic SDXL=7.0, SDXL Turbo/DMD2=1-5)
- Are you using a reasonable step count? (20-40 range, or 4-10 for Turbo/DMD2)
- Have you updated ComfyUI and custom nodes recently?
- Did you note the seed for images you want to reproduce?
- Are there any red error nodes? (missing custom nodes)
- Do you understand what each node in your workflow does?
- Did you read the error message in the console?
Workflow Files
This tutorial includes an example workflow showing the correct setup to avoid common mistakes.
Download Options:
- Download workflow-correct-setup-example.json - Direct download
- GitHub Repository - All workflows with documentation and version history
workflow-correct-setup-example.json
- Properly configured SDXL workflow with explicit VAE loading
- Configured for classic SDXL models: resolution (1024x1024), CFG scale (7.0), step count (30)
- Shows best practices for node organization
- Uses default nodes only
How to Use:
- Download the JSON file or clone the GitHub repository
- In ComfyUI: File → Load → Select the workflow
- Replace checkpoint with your SDXL model
- Verify VAE is loaded explicitly
- Study the settings as a reference for your own workflows
This workflow demonstrates the correct approach discussed throughout the article, avoiding all 10 common mistakes.
Related Tutorials
- ComfyUI Tutorial #1: Install & Create Your First AI Image - Complete beginner’s installation and first image guide
- ComfyUI Tutorial #2: Understanding the Canvas - Master node-based workflows from scratch
- ComfyUI Performance Optimization (coming soon)
- Create Consistent Characters in ComfyUI (coming soon)
Posted October 16, 2025 | Last Updated: October 18, 2025
Based on real issues from the ComfyUI community and beginner feedback.
About Angry Shark Studio
Angry Shark Studio is a professional Unity AR/VR development studio specializing in mobile multiplatform applications and AI solutions. Our team includes Unity Certified Expert Programmers with extensive experience in AR/VR development.
Related Articles
More Articles
Explore more insights on Unity AR/VR development, mobile apps, and emerging technologies.
View All Articles