ComfyUI Tutorial #3: Mastering Generation Parameters

In Tutorial #1, you ran ComfyUI and generated your first image using the default workflow. In Tutorial #2, you built a custom workflow from scratch and learned how nodes work together. You have successfully created images, but you might have noticed several mysterious settings in the KSampler node: seed, steps, CFG scale…
What do these actually do? And how can you use them to get exactly the results you want?
That is what this tutorial is about. We are going deeper into the parameters that control your image generation. By the end of this tutorial, you will understand:
- What each parameter does and why it matters
- How to create reproducible results (same image every time)
- How to systematically experiment with variations
- The trade-offs between quality, speed, and creative control
- How to troubleshoot common generation issues
Let us turn those mysterious numbers into tools you can actually control.
Important: This tutorial focuses on SD1.5 models (the beginner-friendly starting point). Other model families like SDXL, SDXL Turbo, DMD2 merges, and Flux have different optimal parameter ranges. The principles remain the same, but the specific values differ. Always check your model’s documentation on Civitai or Hugging Face.

Understanding What Happens When You Generate
Before we look at each parameter, let us understand what actually happens when you click that Run button.
You might think of image generation as instant magic, but it is actually a step-by-step process. Understanding this process will make the parameters make much more sense.
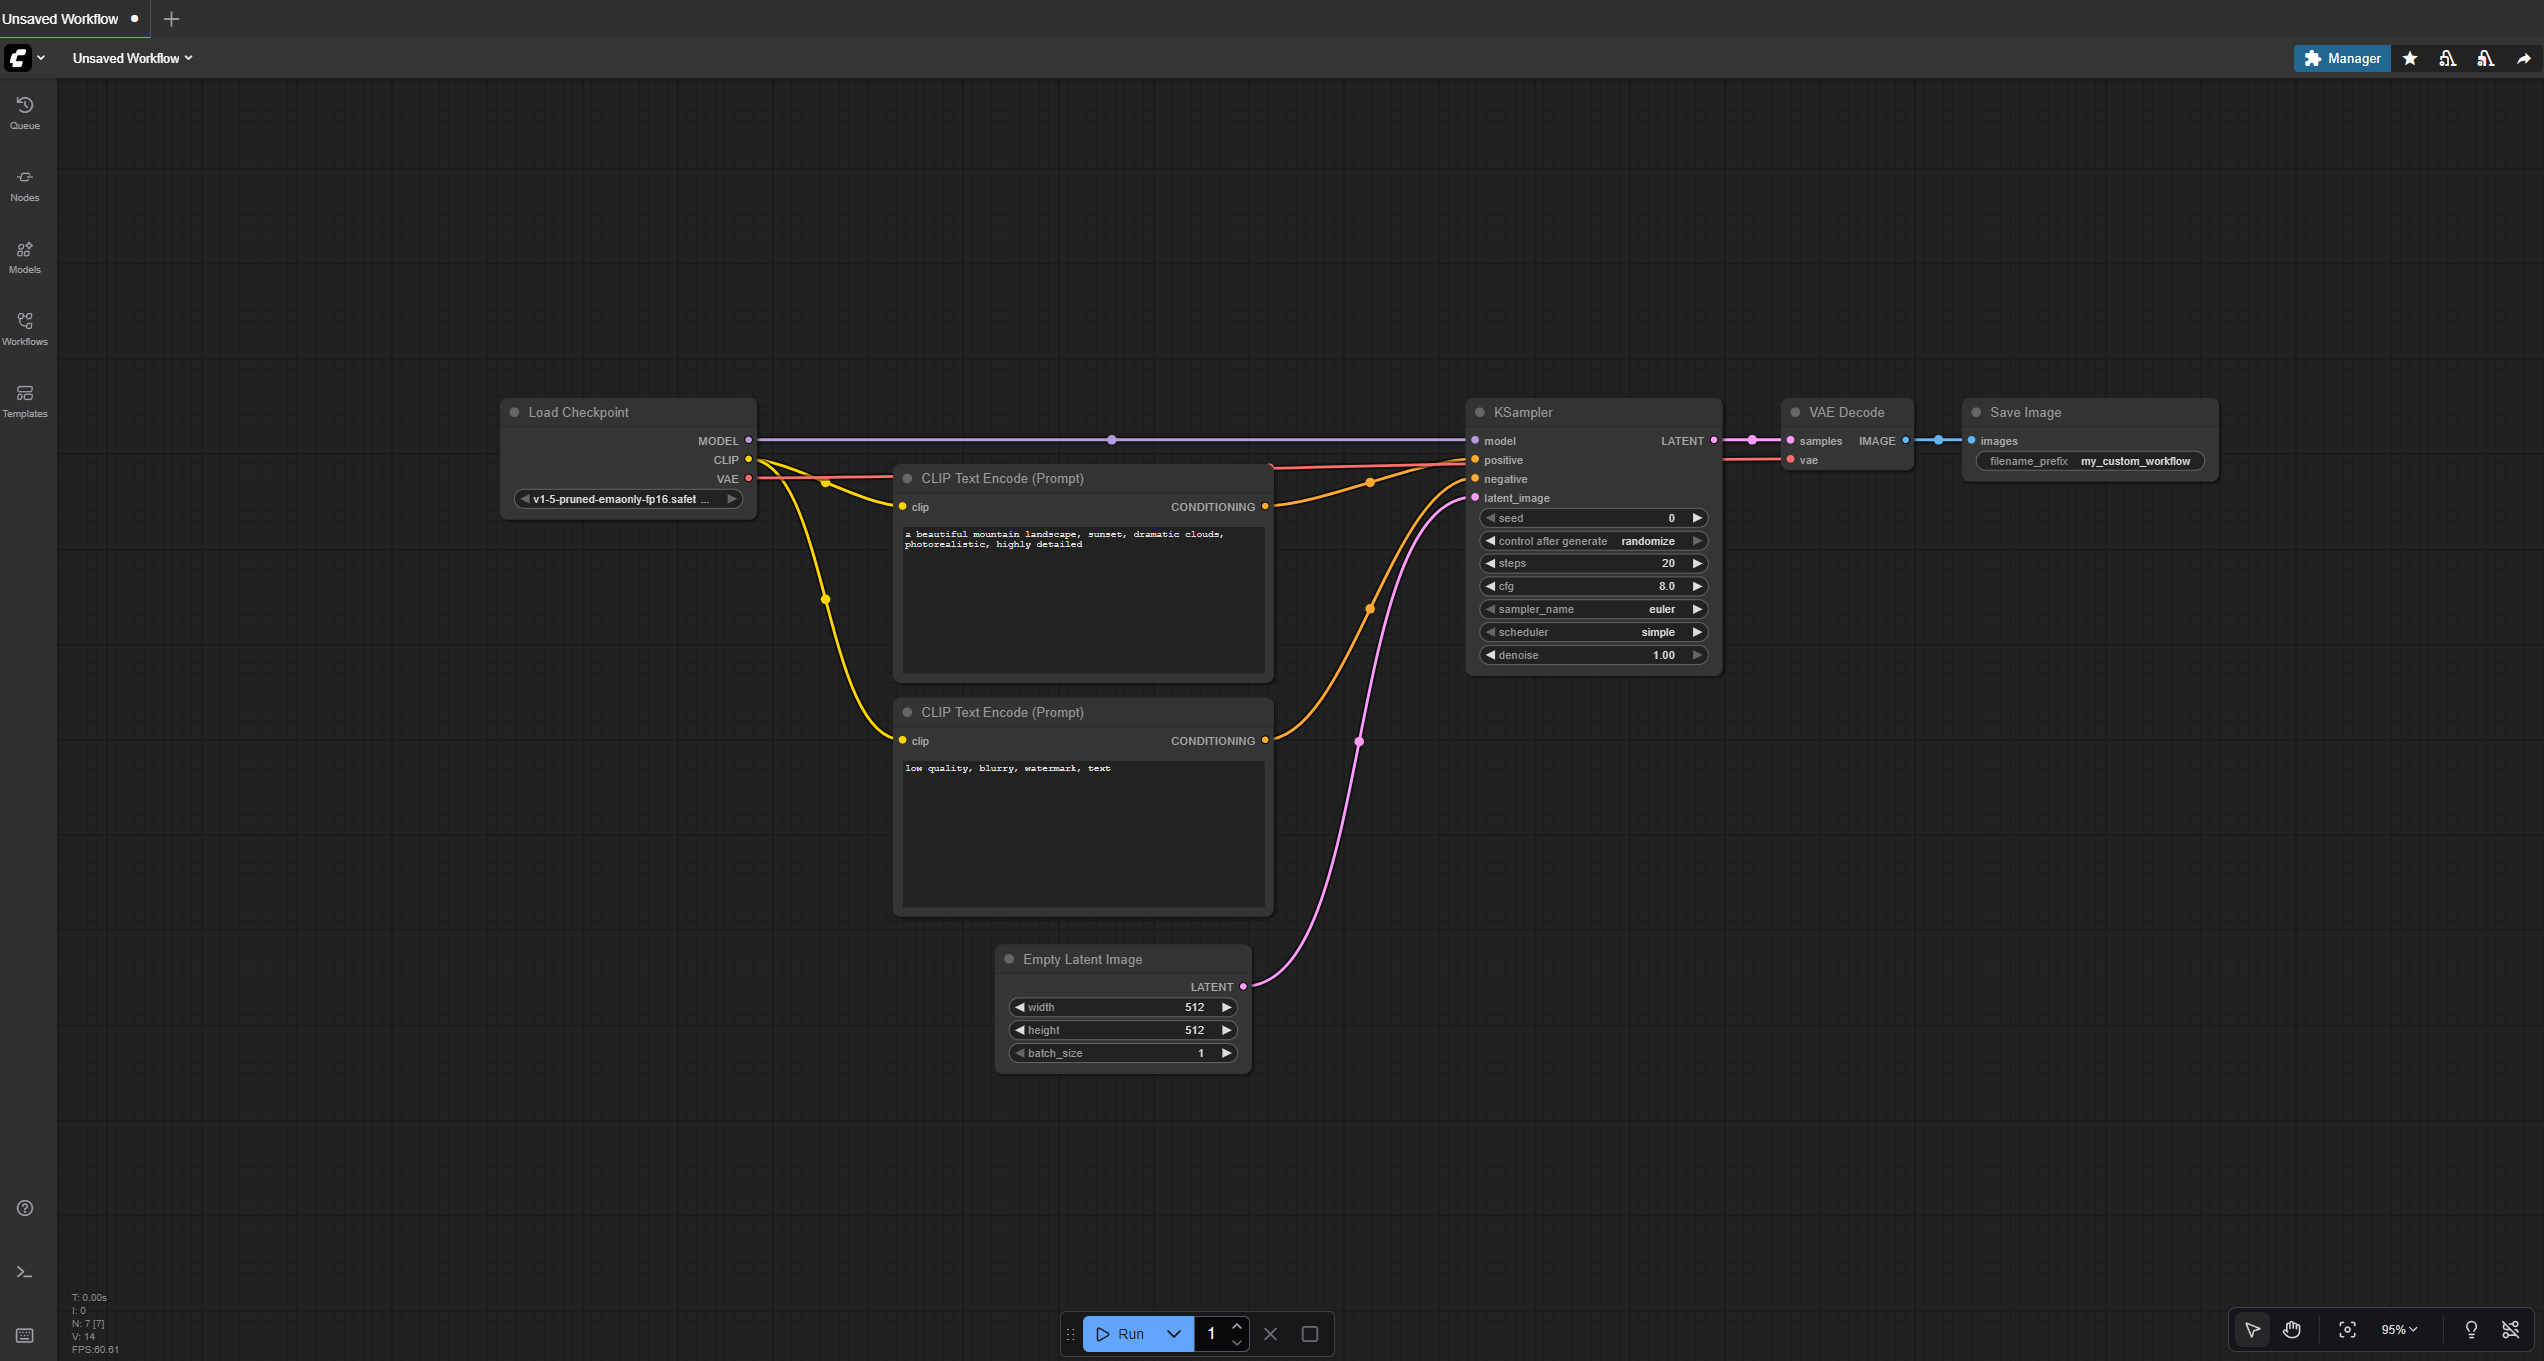
The Generation Process: From Noise to Image
Step 1: Loading Your chosen AI model gets loaded into memory (the GPU’s VRAM).
Step 2: Text Encoding Your prompt gets “encoded” - translated from words into numbers the AI understands. This happens in the CLIP Text Encode nodes.
Step 3: Starting with Noise The AI begins with pure random static - like TV snow or white noise. This is your blank canvas in latent space.
Step 4: Guided Denoising This is where the magic happens. Step by step, the AI “denoises” the static, guided by your prompt. Each step refines the image a little more, gradually revealing the final image.
Step 5: Decoding The VAE Decode node translates the AI’s latent representation into actual pixels you can see.
Step 6: Saving Your finished image gets saved to disk.
Think of it like sculpting from a block of marble. The AI starts with chaos (noise) and chips away, step by step, until your image emerges. Your prompt is the blueprint. The parameters control how this sculpting process unfolds.
BRAIN POWER
Why start with noise?
The AI model was trained to remove noise from images. During generation, it runs this process in reverse: starting with pure noise and gradually “cleaning it up” into a coherent image. Each step removes a bit more noise while adding detail guided by your prompt.
The seed determines what specific noise pattern you start with. The steps determine how many refinement passes you make. The CFG determines how strictly those refinements follow your prompt.
Parameter #1: Seed (Your Image’s DNA)

What It Is
The seed is a random number that determines the starting noise pattern for generation. Think of it as the DNA for your image.
Why It Matters
The SAME seed with the SAME settings and SAME prompt will ALWAYS generate the SAME image. This makes your work reproducible.
Use seed 12345? You get one specific image. Use seed 67890? You get a completely different image. Use 12345 again? You get that same first image back, pixel-perfect.
How to Use It
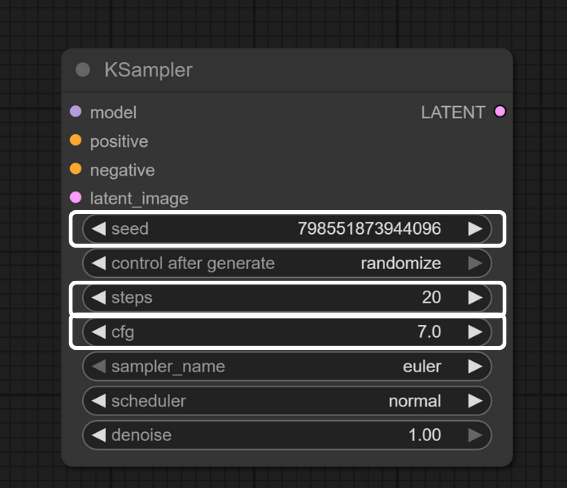
In your KSampler node, look for the seed parameter. You have several options:
Random (Default):
- Generates a new random seed each time
- Best for exploration and finding interesting compositions
- Each generation will be completely different
Fixed Seed (Specific Number):
- Type in a specific number (like 12345)
- Generates the exact same image every time
- Best when you found a composition you like and want to refine it
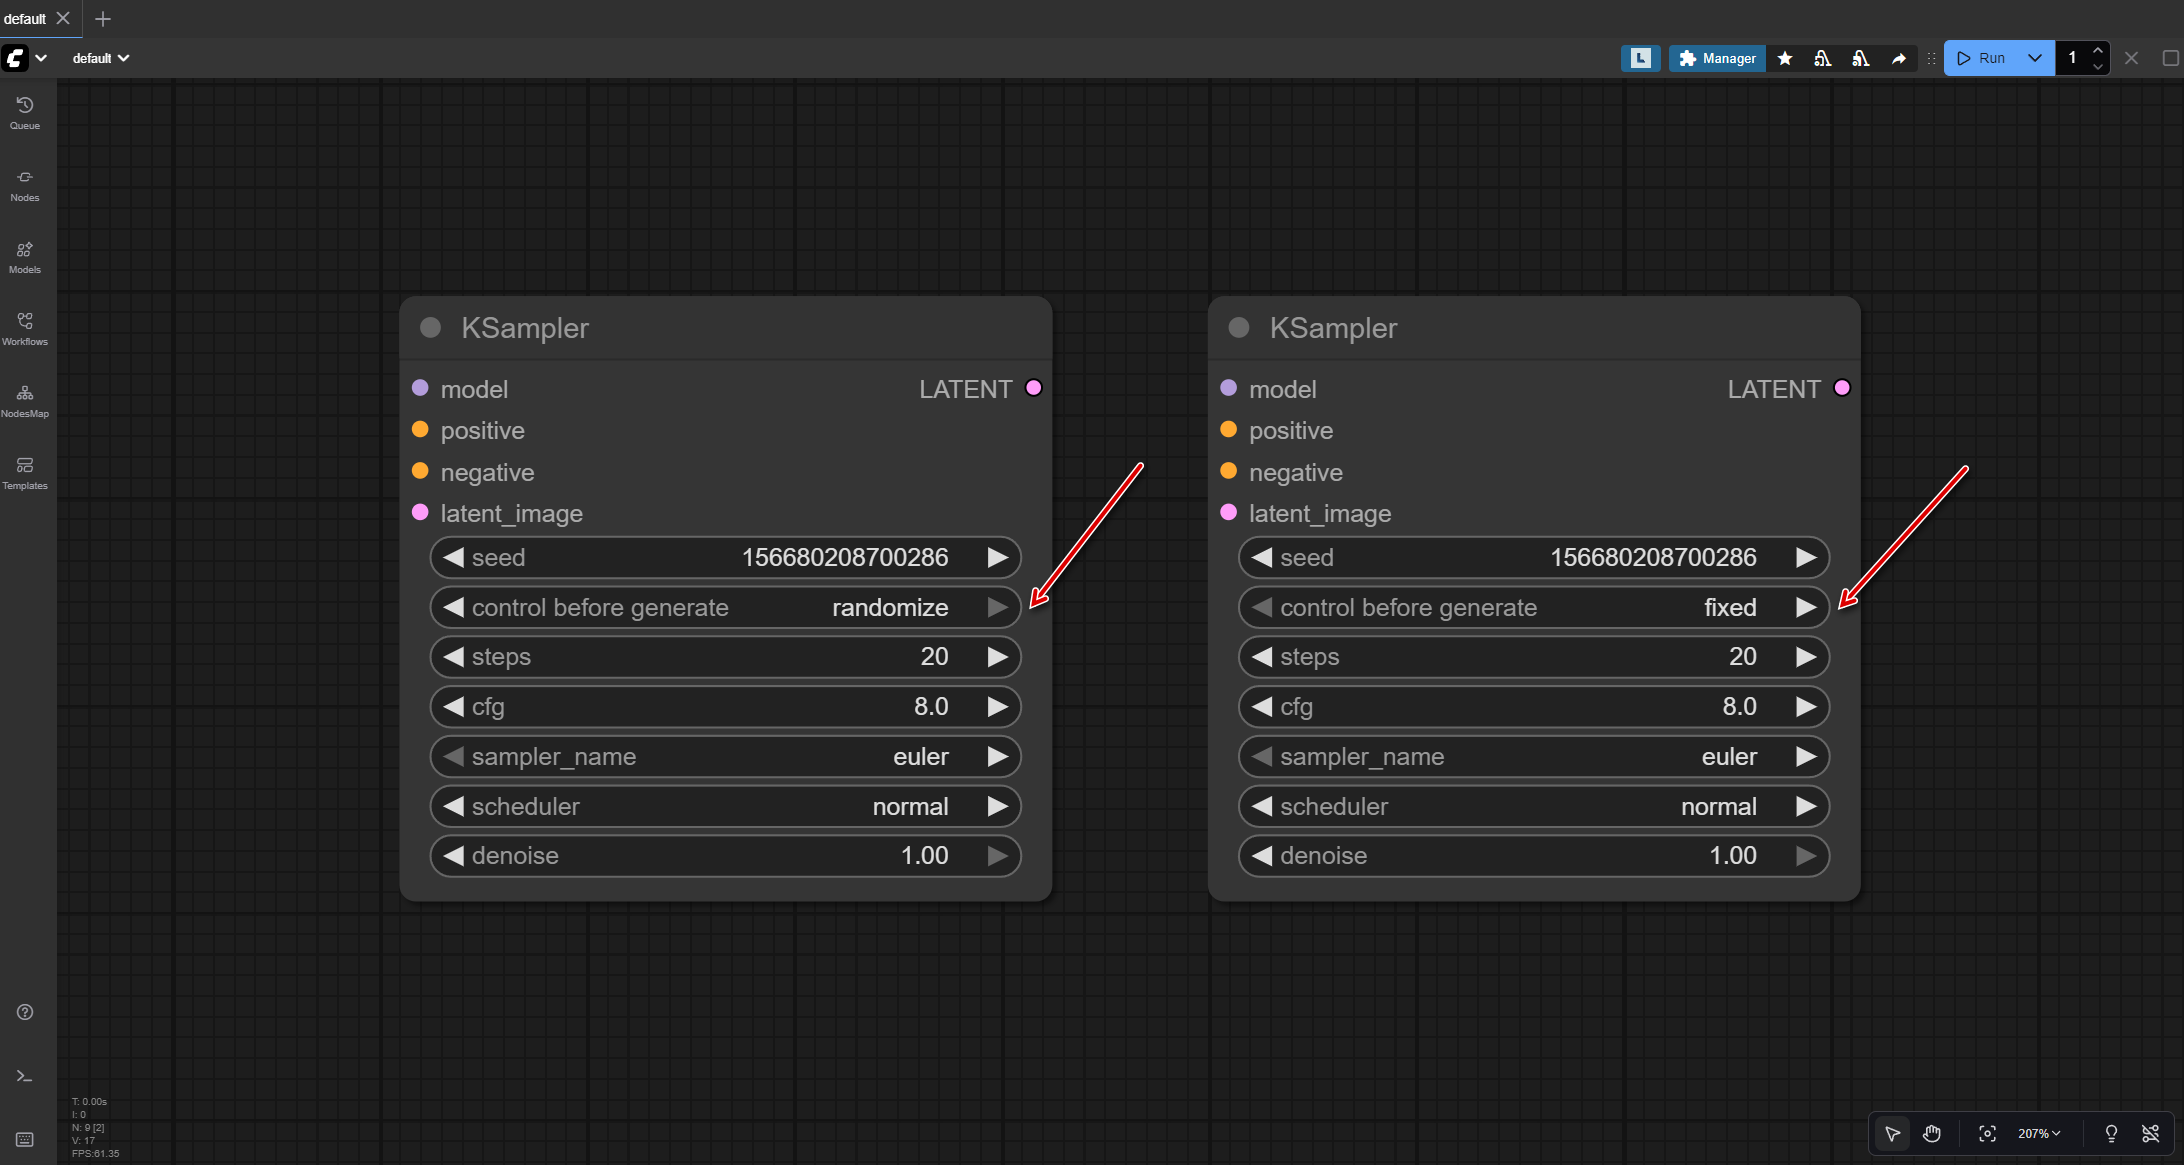
Seed Controls: After generating, you can configure seed behavior (usually via control_after_generate in KSampler):
- Randomize - New random seed each time
- Increment - Seed increases by 1 (different random noise each time)
- Decrement - Seed decreases by 1
- Fixed - Uses the same seed every time
When to use each option:
- Use Randomize when exploring and generating many different compositions
- Use Increment to explore completely different compositions while keeping other settings constant
- Use Fixed when you have found the perfect composition and want to refine just the prompt or other parameters
- Use Decrement rarely - it is just increment in reverse, useful if you accidentally went too far with increment
Pro tip: To create actual variations of a good image, use the SAME seed and modify your prompt, adjust LoRA weights, or change other parameters. Changing the seed (even by +1) generates completely different random noise and unpredictable results. The increment feature is useful for exploring multiple random compositions quickly, not for creating variations.
BRAIN POWER
Seeds Are Your Secret Weapon
Found an image you love? Write down the seed number. Now you can:
- Make small tweaks to the prompt while keeping the same composition
- Regenerate it at higher resolution
- Create variations of the exact same base
- Share the exact recipe with others
- Test different prompts on the same composition to see what works best
- Build a collection of favorite seeds that produce good base compositions
- Collaborate with others by sharing seed numbers along with your settings
- Create a series of images with consistent composition but different subjects
Professional AI artists keep a “seed library” - a collection of seed numbers that reliably produce good compositions for different subjects (portraits, landscapes, action scenes, etc.).
Seeds turn AI art from random chaos into reproducible creativity.
Practical Example: Seed Variation
Let us say you are generating “a cozy coffee shop interior, warm lighting, wooden furniture.”
- Seed 12345: Might give you a view from the entrance, tables on the right
- Seed 67890: Might show the counter area, espresso machine prominent
- Seed 111213: Might present a corner table view, window in background
Same prompt, same quality, completely different compositions. That is the power of seeds.
Why does this happen? Each seed creates a different starting noise pattern. Think of it like starting a painting on different textured canvases - the same paint (your prompt) creates different results based on the underlying texture (the noise pattern).
Try this yourself right now: Use the same prompt with three different seeds. You will see dramatically different compositions. This is why seeds matter - they let you explore multiple interpretations of the same idea without changing anything else.
Finding a great seed is like finding a great camera angle. Once you have it, you can photograph (or prompt) different things from that same perspective.
Parameter #2: Steps (The Refinement Passes)
What It Is
Steps is the number of times the AI refines the image during generation. More steps means more refinement passes.
Why It Matters
More steps generally means better quality, but with diminishing returns. It also means slower generation.
Think of an artist painting:
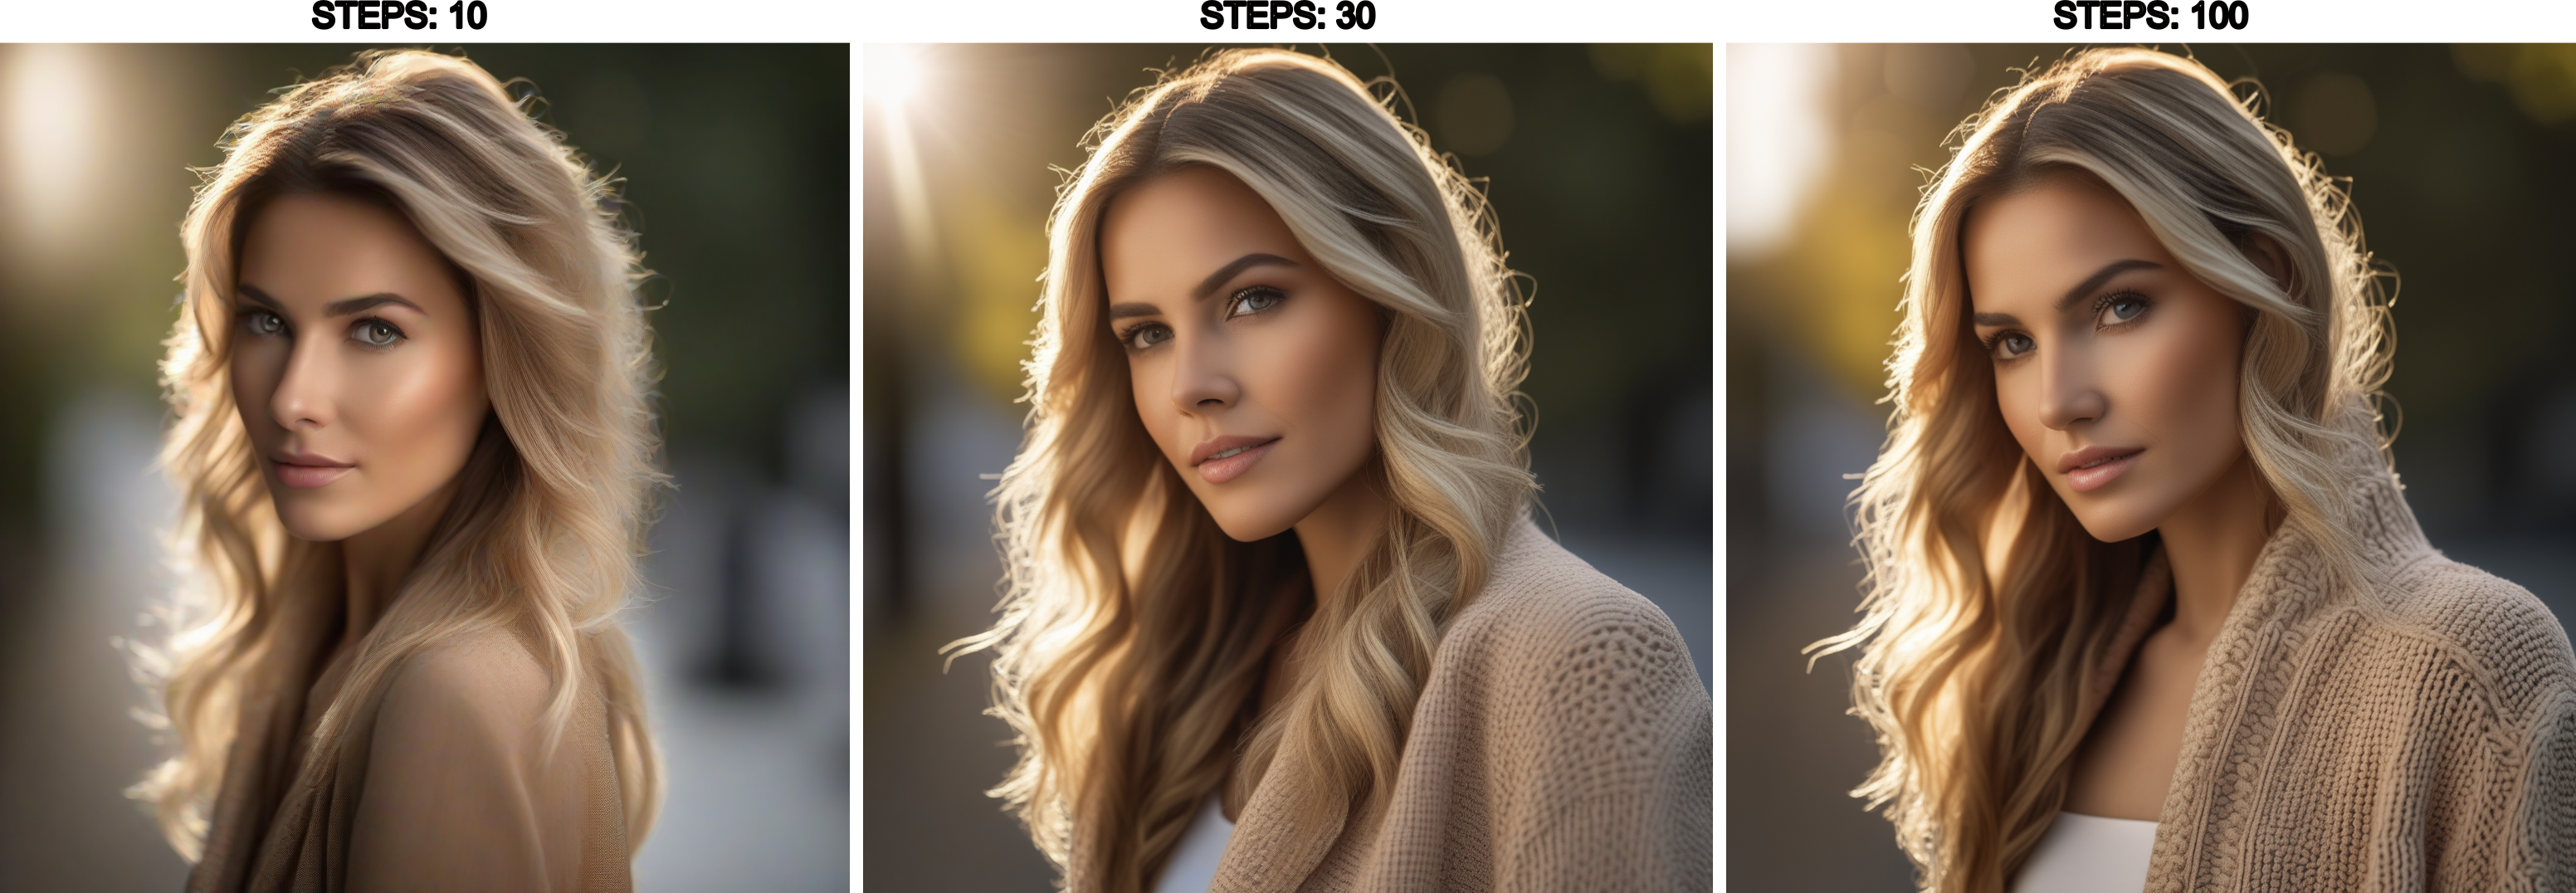
- Step 10: Rough sketch, basic shapes
- Step 20: Details starting to emerge, composition clear
- Step 30: Refined and polished
- Step 50: Extra fine details
- Step 100: Barely any difference from step 50
The key insight: you hit diminishing returns quickly. Going from 10 to 30 steps makes a big difference. Going from 50 to 100? Barely noticeable, and it takes twice as long.
The Sweet Spot
For most work: 20-30 steps
- Testing/Experimentation: 15-20 steps (faster, good enough to see composition)
- Final Images: 30-40 steps (high quality without wasting time)
- Special Cases: 50+ steps (rarely needed, diminishing returns)
This range works well because it balances three critical factors: generation speed, image quality, and computational efficiency. Most modern samplers converge to a stable image within 20-30 steps, meaning additional steps add minimal visible improvement while consuming significantly more time and GPU resources.
How do you know you are in the sweet spot? Generate the same image at 20, 30, and 40 steps using the same seed. If you cannot spot meaningful differences between 30 and 40, you are at the point of diminishing returns. Below 20 steps, you will notice rough edges, incomplete details, or composition instability. Above 40 steps, generation time doubles but quality improvement becomes imperceptible to the human eye.
A practical workflow: Start at 30 steps for any new prompt or model. If the image looks complete and polished, try reducing to 25 or 20 to save time. If you see artifacts or unfinished areas, increase to 35 or 40. This approach helps you find the minimum steps needed for quality results, which saves time across hundreds of generations.
Note that some specialized models or samplers may have different optimal ranges - always check the model’s documentation on Civitai for recommended step counts. Certain artistic styles intentionally use fewer steps (10-15) for a sketch-like aesthetic.
How to Use It
In your KSampler node, set steps to your desired value. Start with 30 and adjust based on your needs.
The adjustment process is iterative: generate once at 30 steps, examine the result closely, then decide if you need more refinement or can reduce for speed. Look specifically at fine details like hair strands, fabric textures, and background elements - these areas show step count impact most clearly. If these details appear complete and sharp, you can likely reduce steps. If they look unfinished or blurry, increase step count.
Steps interact with other parameters, particularly CFG and your chosen sampler. Higher CFG values (8-10) may require fewer steps to converge, while lower CFG values (5-6) might need more steps for the same quality level. Different samplers also have different step requirements - some samplers produce quality results at 20 steps, while others need 30-35 for the same output.
When to use fewer steps (15-20):
- Quick previews
- Testing prompts
- Exploring ideas rapidly
- Limited GPU power
When to use more steps (35-50):
- Final production images
- Maximum quality needed
- You have time to wait
WATCH OUT
More steps do not always mean better
Going beyond 50 steps usually does not help much and just wastes time. Some people generate at 150 steps, thinking it will be amazing, but you often cannot even see the difference from 35 steps.
Start at 30. Only increase if you have a specific reason.
Parameter #3: CFG Scale (The Guidance Dial)

What It Is
CFG (Classifier Free Guidance) controls how strictly the AI follows your prompt. Lower values give the AI more creative freedom. Higher values make it follow your prompt more literally.
Why It Matters
Too low and the AI ignores you. Too high and the AI overdoes everything, creating artificial-looking, oversaturated images.
CFG Scale Zones (for SD1.5 models):
- CFG 1-4: AI goes rogue, barely listens to your prompt
- CFG 5-9: Sweet spot - AI follows your prompt but stays creative
- CFG 10-15: AI follows TOO closely, images can look overcooked
- CFG 16+: Usually produces weird artifacts and oversaturation
Note: These are practical guidelines for SD1.5. Other model families (SDXL, Flux, etc.) have different optimal ranges - always check your model’s documentation.
Think of CFG like volume on a speaker:
- Too low (CFG 2) = You can barely hear the music
- Just right (CFG 7) = Clear, balanced, perfect
- Too high (CFG 15) = Distorted, unpleasant, blown out
The Magic Number
CFG 7.0 is the standard for good reason - it just works.
Start here. This gives you a great balance between following your prompt and maintaining natural-looking results.
How to Use It
In your KSampler node, set cfg to 7.0 as your starting point.
When to adjust:
- Want more creative interpretation? Try CFG 5-6
- Need strict prompt adherence? Try CFG 8-9
- Images look washed out? Lower the CFG
- AI not following your prompt? Raise the CFG (but stay under 12)
THERE ARE NO DUMB QUESTIONS
Q: Can I use decimals like 7.5?
A: Yes. CFG accepts decimals. 7.5, 8.2, 6.8 - whatever you want.
Q: I saw someone use CFG 15 and their image looked great. Why did you say it is too high?
A: Some models are trained differently and handle higher CFG better. But as a beginner, stick with 6-8. You can experiment later when you understand what you are looking for.
Q: Should I use different CFG values for different subjects (like portraits vs landscapes)?
A: Not necessarily. CFG controls how strictly the AI follows your prompt, not the subject type. Stick with CFG 7 for most subjects. Only adjust if the AI is not following your prompt (raise it) or if images look oversaturated (lower it).
Q: What happens at CFG 20?
A: Usually nothing good. Oversaturated colors, weird artifacts, unnatural edges. But try it once just to see. Breaking things is how we learn.
BRAIN POWER
Using Flux Models?
If you’re using Flux models instead of SD1.5, the CFG recommendations are completely different. Flux dev FP8 checkpoint works best at CFG = 1.0 (see official Flux examples). Using CFG 7.0 on Flux will break generation. This tutorial focuses on SD1.5, so always check your specific model’s documentation.
Parameter #4: Resolution (Your Canvas Size)
What It Is
Resolution is the width and height of your image in pixels. This is set in the Empty Latent Image node, not the KSampler.
Why It Matters
Bigger resolution means more detail but slower generation and more VRAM usage. But here is the catch: you cannot just make any size you want.
Important: SD 1.5 Was Trained at 512x512
The SD1.5 model you downloaded in Tutorial #1 was trained on 512x512 images. This means:
Good sizes (multiples of 64 near 512):
- 512 x 512 (square - fastest, most reliable)
- 512 x 768 (portrait)
- 768 x 512 (landscape)
- 640 x 640 (larger square)
- 768 x 768 (larger, but slower)
Problematic sizes:
- 1024 x 1024 (too large for SD1.5, causes repetition and artifacts)
- 256 x 1024 (extreme aspect ratio, causes distortion)
- 513 x 513 (not a multiple of 64, causes issues)
How to Use It
In your Empty Latent Image node:
- width: Set to your desired width (stick to multiples of 64)
- height: Set to your desired height (stick to multiples of 64)
For learning and experimentation: Use 512 x 512
For final images: You can use 512 x 768 (portraits) or 768 x 512 (landscapes)
Want bigger images? Generate at 512, then use upscaling techniques (we will cover this in a later tutorial). SD1.5 does not work well at 1024x1024.
BRAIN POWER
Resolution Rules of Thumb
- Stick to multiples of 64 (512, 576, 640, 768…)
- SD 1.5 base resolution is 512
- Bigger does not equal better (especially on SD1.5)
- Want bigger? Generate at 512, then upscale later
- For now: 512 x 512 is your friend - fast, predictable, perfect for learning
Systematic Experimentation: The Scientific Approach
Now that you understand the four core parameters, let us put this knowledge into practice. The key to learning is systematic experimentation: change ONE variable at a time.
Why one at a time? Because then you know exactly which change caused which effect.
The Control Image Concept
In scientific experiments, you have a “control” - a baseline to compare against. Let us create your control image first.
Your Control Settings:
- Prompt: “a cozy coffee shop interior, warm lighting, wooden furniture, comfortable atmosphere”
- Negative: “blurry, bad quality, distorted”
- Seed: 12345 (we will use this same seed for comparison tests)
- control after generate: fixed
- Steps: 30
- CFG: 7.0
- Size: 512 x 512
Generate this image now. This is your baseline.
Experiment #1: Seed Variation (Composition Changes)
Keep everything the same EXCEPT the seed. This shows you how different seeds create different compositions.
Generate these three images:
- Seed 12345 (your control - already done)
- Seed 67890 - Same prompt, steps: 30, CFG: 7, size: 512x512
- Seed 111213 - Same prompt, steps: 30, CFG: 7, size: 512x512
What to observe:
- Completely different camera angles and layouts
- Same “cozy coffee shop” feeling maintained
- Different furniture arrangements
- Same quality level across all three
Look at each image and notice which composition appeals to you most. You might prefer one camera angle over another, or find one furniture arrangement more interesting - this is why generating multiple seeds is valuable when starting a new project. Pay attention to where the focal points are in each image: is the espresso machine the star, or is it the seating area? Notice how the lighting hits different parts of the scene depending on the composition. Each seed gives you a completely different interpretation of the same concept, letting you choose the best starting point for further refinement.
This demonstrates that seeds control composition and layout, not quality or style.
Experiment #2: Steps Variation (Quality Changes)
Now let us see how steps affect quality. Use the SAME seed (12345) so we are comparing the same composition at different refinement levels.
Generate these three images:
- Steps: 10 - Seed 12345, CFG: 7, size: 512x512
- Steps: 30 - Seed 12345, CFG: 7, size: 512x512
- Steps: 50 - Seed 12345, CFG: 7, size: 512x512
What to observe:
- Steps 10: Rougher, less refined details
- Steps 30: Clean and polished
- Steps 50: Slightly better than 30, but hard to spot the difference
Examine the 10-step image closely and look for rough edges, incomplete textures, or areas that feel unfinished. Then compare it to the 30-step version - you should see significantly crisper details, smoother surfaces, and more refined textures throughout. Now look at the 50-step image and try to spot differences from the 30-step version. You might notice slightly smoother gradients or marginally better edge definition, but you have to look carefully. This is the key lesson: the quality improvement from 10 to 30 steps is dramatic and obvious, while the improvement from 30 to 50 is minimal and requires close inspection.
Notice how the jump from 10 to 30 is significant, but 30 to 50 barely changes anything? That is the diminishing returns in action.
Experiment #3: CFG Variation (Prompt Adherence)
Finally, let us see how CFG affects how strictly the AI follows your prompt. Again, use the same seed (12345).
Generate these three images:
- CFG: 3 - Seed 12345, steps: 30, size: 512x512
- CFG: 7 - Seed 12345, steps: 30, size: 512x512
- CFG: 12 - Seed 12345, steps: 30, size: 512x512
What to observe:
- CFG 3: More artistic interpretation, might drift from “coffee shop”
- CFG 7: Clearly matches your prompt, balanced result
- CFG 12: Very literal interpretation, might look oversaturated or “crispy”
Start with the CFG 3 image and notice if it still feels like a coffee shop or if the AI took creative liberties - perhaps the furniture is more abstract, or the scene feels dreamier and less grounded in reality. The AI is listening to your prompt, but not following it strictly. Now look at CFG 7 and see how it clearly delivers what you asked for: a recognizable coffee shop with warm lighting and wooden furniture, all balanced and natural-looking. Finally, examine the CFG 12 image and check for signs of over-processing: are the colors too vivid or saturated? Do edges look artificially sharpened or “crunchy”? Does it feel like the AI tried too hard to match every word in your prompt?
CFG 7 usually gives the best balance - clear prompt adherence without overdoing it.
The 5 Variations Challenge
Now that you have done systematic experiments, here is a challenge that combines everything you have learned.

Your Mission: Create 5 Deliberate Variations
Using the “cozy coffee shop” prompt (or choose your own subject), create these 5 images:
Variation 1: The Baseline
- Prompt: “a cozy coffee shop interior, warm lighting, wooden furniture, comfortable atmosphere”
- Seed: Random (let it generate, then write down the number)
- Steps: 30
- CFG: 7
- Size: 512x512
Variation 2: The Style Twist
- Add a style modifier to your prompt: “modern minimalist” OR “vintage rustic” OR “industrial”
- Same seed as Variation 1 (to see how prompt changes affect the same composition)
- Steps: 30, CFG: 7, Size: 512x512
Variation 3: The Quick Draft
- Same prompt as Variation 1
- Same seed as Variation 1
- Steps: 15 (see the lower quality)
- CFG: 7, Size: 512x512
Variation 4: The Strict Follower
- Same prompt as Variation 1
- Same seed as Variation 1
- Steps: 30
- CFG: 11 (see the over-adherence)
- Size: 512x512
Variation 5: The Wild Card
- Same prompt as Variation 1
- Seed: Random (completely new composition)
- Steps: 30, CFG: 7, Size: 512x512
What You’ll Learn
After completing this exercise, you should be able to:
- Explain what seed, steps, and CFG do
- Generate reproducible results (same seed = same image)
- Create intentional variations
- Understand the trade-offs between settings
- Feel confident experimenting further
BRAIN POWER
Keep Notes on What Works
Create a simple text file with your findings:
- Which seed gave you the best composition?
- Could you see the difference between 15 and 30 steps?
- What did CFG 11 do compared to CFG 7?
- Which variation is your favorite?
This self-reflection cements the learning. Plus, you will have your seeds saved for later.
Comparing Results Side-by-Side
Now that you have multiple variations, let us talk about comparing them effectively.
Your brain is excellent at spotting differences when you can see images side-by-side. But looking at them one at a time makes it much harder to remember details.
Methods for Comparison
Method 1: File Explorer Grid View
- Navigate to your ComfyUI output folder
- ComfyUI Desktop: Outputs are in the configured base path (check
%APPDATA%\ComfyUI\config.jsonon Windows for your output location) - Portable/Manual installation: Default
ComfyUI/output/unless you’ve reconfigured it - Switch to thumbnail or grid view
- Arrange windows to see multiple images at once
- Great for quick comparisons
Alternatively, you can access the output folder through ComfyUI’s interface by clicking the ComfyUI button and navigating to the Help menu.
Method 2: Screenshot Collage
- Take screenshots of your favorite variations
- Paste them into a document or image editor
- Arrange side-by-side for easy comparison
- Good for documentation
Method 3: Mental Checklist
For each image, evaluate:
- Composition: Is the layout interesting?
- Quality: Are details crisp or blurry?
- Prompt adherence: Does it match what you asked for?
- Style: Does the overall vibe feel right?
- Surprises: Any unexpected elements (good or bad)?
THERE ARE NO DUMB QUESTIONS
Q: How do I know which image is “better”?
A: There is no objective “better” - only what YOU prefer. Some people love highly detailed images. Others prefer softer, more artistic looks. Trust your taste.
Q: All my images look similar. Is that normal?
A: If you are using the same seed and similar settings, yes. That is actually good - it means you understand reproducibility. Want more variety? Use random seeds or change prompts more dramatically.
Q: Can I generate multiple images at once?
A: Not in the basic workflow, but yes with batch processing (we will cover that in a later tutorial). For now, generating one at a time helps you learn what each parameter does.
Q: Should I save all my test images or delete the ones I do not like?
A: Keep them, at least initially. Those “failed” experiments teach you what not to do. You might also discover that an image you dismissed initially looks better after you compare it to others. You can always delete them later, but you cannot recreate the learning experience they provide.
Q: How do I remember which settings created which image?
A: ComfyUI automatically embeds all your settings in the image metadata. Simply drag any generated image back onto the canvas and your entire workflow (including all parameter values) will load. This makes it easy to recreate or modify any result.
Troubleshooting Common Issues
Things will go wrong sometimes. That is okay - every AI artist has generated thousands of unexpected results. It is part of the learning process.

Issue #1: Black Image / Solid Color Output
What it looks like: Your image is completely black, gray, or one solid color.
Why it happens: Usually a VAE (encoder/decoder) problem.
Fixes to try:
- Make sure your VAE Decode node is connected to the Load Checkpoint’s VAE output
- Check that all connections are green (not red)
- Restart ComfyUI and try again
Issue #2: Out of Memory Error
What it looks like: Error message saying CUDA out of memory or similar.
Why it happens: Your GPU does not have enough VRAM for the image size.
Fixes to try:
- Reduce image size - Try 384x384 instead of 512x512
- Close other programs using GPU memory
- Reduce batch size to 1
- Restart ComfyUI
Issue #3: Weird, Distorted, or Low-Quality Images
What it looks like: Images that look wrong - extra limbs, melted faces, unclear details.
Why it happens: Several reasons.
Fixes to try:
- Check your CFG - Too high (15+) causes weird artifacts
- Try a different seed - Some seeds just produce poor results
- Simplify your prompt - Too complex can confuse the AI
- Check your resolution - SD1.5 does not like sizes far from 512
- Add negative prompts - “deformed, ugly, bad anatomy, bad proportions”
- Increase steps - 10 steps is too few, try 20-30
Issue #4: Nothing Happens When Clicking Run
What it looks like: Button does nothing, no progress bar, no generation.
Why it happens: Workflow issue, ComfyUI problem, or caching.
Fixes to try:
- Check if you are using a fixed seed with the same settings. ComfyUI caches results and will not regenerate the exact same image. Change the seed or any parameter to force a new generation
- Check all connections. Any red lines? Fix them first
- Look at the console/terminal (bottom panel toggle on the side bar). Error messages appear there
- Refresh the browser if using the web interface
- Restart ComfyUI
Issue #5: Generation is Very Slow
What it looks like: Progress bar crawls, takes several minutes per image.
Why it happens: Hardware limitations or settings issues.
Fixes to try:
- Check if you are using GPU - CPU mode is significantly slower (often 10-50x depending on hardware)
- Reduce steps - Try 20 instead of 30
- Reduce image size - 384x384 generates faster than 512x512
- Close other GPU applications
Issue #6: Image Looks Grainy or Noisy
What it looks like: Image has visible noise, grain, or looks unfinished.
Why it happens: Not enough steps to fully refine the image.
Fixes to try:
- Increase steps to 30-40
- Check your sampler choice (some samplers need more steps than others)
WATCH OUT
The Troubleshooting Mindset
When something goes wrong:
- Do not panic - Everyone deals with this
- Read error messages - They usually tell you exactly what is wrong
- Change ONE thing at a time - So you know what fixed it
- Start simple - Strip down to basics, then rebuild
- Search for the error message online - You’re probably not the first
- Ask for help - ComfyUI community is helpful
Debugging is learning. Every error teaches you how the system works.
What You have Mastered
Let us appreciate what you have learned in this tutorial:
- Understanding generation: You know what happens when you click Run
- Seed mastery: You can create reproducible results and controlled variations
- Steps knowledge: You understand the quality/speed trade-off
- CFG control: You know how to balance prompt adherence
- Resolution awareness: You understand size constraints for SD1.5
- Systematic experimentation: You can test variables methodically
- Comparison skills: You can evaluate results effectively
- Troubleshooting: You know how to fix common issues
You’re no longer just clicking buttons and hoping. You understand WHY images look the way they do, and you can deliberately control the results.

What is Next
Congratulations on completing Tutorial #3 - the final free tutorial in our blog series.
You’ve learned the fundamentals of ComfyUI:
- Tutorial #1: Installation and first image generation
- Tutorial #2: Understanding the canvas and building workflows
- Tutorial #3: Mastering generation parameters
Quick Reference Card
Parameter Quick Reference
Seed:
- Purpose: Controls composition/layout
- Range: Any integer
- Default: Random
- For exploration: Use random
- For refinement: Use a fixed number
Steps:
- Purpose: Refinement quality
- Typical usage (SD1.5): 10-50 steps
- UI supports: 1-10,000 (but diminishing returns beyond 50)
- Sweet spot: 20-30
- Testing: 15-20
- Final: 30-40
CFG Scale (for SD1.5):
- Purpose: Prompt adherence
- Typical usage (SD1.5): 4-12
- UI supports: 0-100 (but extreme values rarely useful)
- Sweet spot: 6-8
- Standard: 7.0
- Avoid: 15+
- Note: Other models may differ - check model card
Resolution:
- Purpose: Image size
- SD1.5 base: 512x512
- Common: 512x512, 512x768, 768x512
- Multiple of: 64
- Avoid: 1024+ with SD1.5
You have completed Tutorial #3. You now have precise control over your image generation.
Glossary
- Seed: The random number that determines image composition (reproducibility control)
- Steps: Number of refinement passes the AI makes (quality vs speed)
- CFG Scale: Classifier Free Guidance - how strictly the AI follows your prompt
- Resolution: The width and height of your image in pixels
- Latent Space: The AI’s internal compressed representation
- VAE: Variational Auto-Encoder - translates between latent and pixel space
- VRAM: Video RAM on your GPU - where models and images are processed
- Denoising: The process of removing noise to reveal the final image
About Angry Shark Studio
Angry Shark Studio is a professional Unity AR/VR development studio specializing in mobile multiplatform applications and AI solutions. Our team includes Unity Certified Expert Programmers with extensive experience in AR/VR development.
Related Articles
More Articles
Explore more insights on Unity AR/VR development, mobile apps, and emerging technologies.
View All Articles